User guide
Getting to Pronoia
Delphi ecosystem — user guides
Which way to Pronoia?
Facilitation (Pronoia)
A Delphi study gets into Pronoia by one of two ways. Both end in the same place: a ready study whose panel, theses and rounds you can still edit after it has been created. The difference is where you start from.
- Choose a template – one for each Delphi variation.
- Go through the seven steps and change what is yours.
- Create the study in Pronoia.
- Import a file made with the planning plugins or saved from the wizard – or choose a special template or an example study.
- Check the preview.
- Create the study, or open the plan in the wizard to edit it.
Where to find them
Both are side by side in the dashboard sidebar: ➕ New study (wizard) and 📥 Import plan file. Hovering over a button shows a short hint about who it is for.
The ways cross
Choosing one does not close the other:
- In the last step of the wizard you can save the plan as a file and import it later – for example after a colleague has checked it.
- From the import page you can open any plan or template in the wizard and go through it step by step before creating the study.
Next
- Your first Delphi with the wizard – a picture of every step.
- From a plan to Pronoia – the plan file, special templates and example studies.
- Finishing your plan in Pronoia – after either way: from a draft to ready to invite.
Your first Delphi with the wizard
Facilitation (Pronoia)
The wizard is the way to your first Delphi. It asks for the study's details in seven steps, and a ready template fills in every step for you. Your task is to change what is yours: the topic, the phenomenon, the panel and the theses.
Open the wizard from the dashboard button ➕ New study (wizard). Set aside half an hour to an hour.
Before you start
- Every step has guidance. Open it from What happens in this step? The ⓘ next to a field explains a single choice.
- An unfinished plan is kept. The wizard saves it in your browser after every change, so you can continue later on the same computer.
- Nothing is locked. Everything can still be edited in Pronoia after the study has been created.
Start from a template
The templates are at the bottom of the wizard's first step, below the navigation buttons. There are four, one for each Delphi variation:
- Classic Delphi – scale theses with reasoning and an expert panel, two rounds. The safest first choice.
- Argument Delphi – the reasoning and the panel's discussion are the core of the data.
- Real-Time Delphi – one round that is open from start to finish; panelists see the group's position and update their own at any time.
- Barometer Delphi – the same theses in recurring measurement waves for long-term monitoring.
If you are not sure where to start, choose Classic Delphi or Real-Time Delphi. Press Use this template on the template's card.
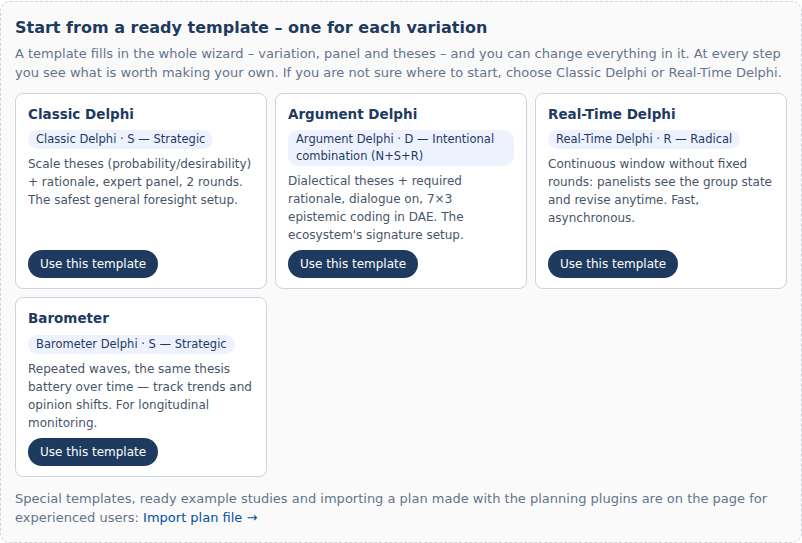
Once a template is loaded, an orange box at the top of every step tells you what is worth changing in the template at that step. In an empty wizard the template loads straight away. If steps 2–7 already have content, the wizard first asks whether to replace it with the template. The title, subtitle and purpose are always kept.
Step 1: Study
Write the Title and Purpose / research question for your own topic. On a first study, keep the template's orientation and variation as they are – they were chosen to fit the template. Each option has a short explanation underneath, and the link Which variation fits? Read the guide: the four variations → takes you to a comparison.
Locale is the language in which the panelists see the study. It can differ from the language you use the wizard in.
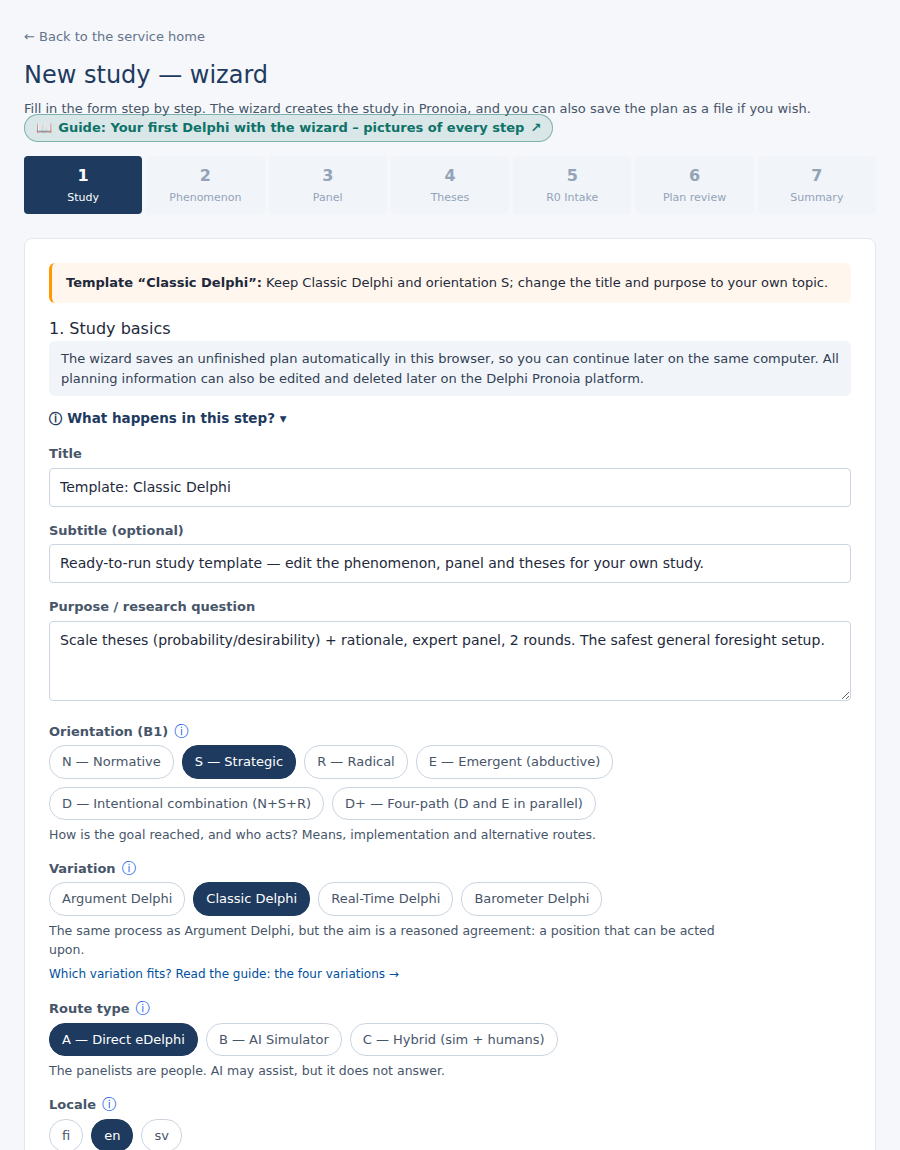
Step 2: Phenomenon
The phenomenon description is the core of the study: what is studied and what is left out. Replace the template's FILL IN text with your own description – at least 100 characters. Sub-questions and blind spots are optional; empty rows can be removed with the × button.
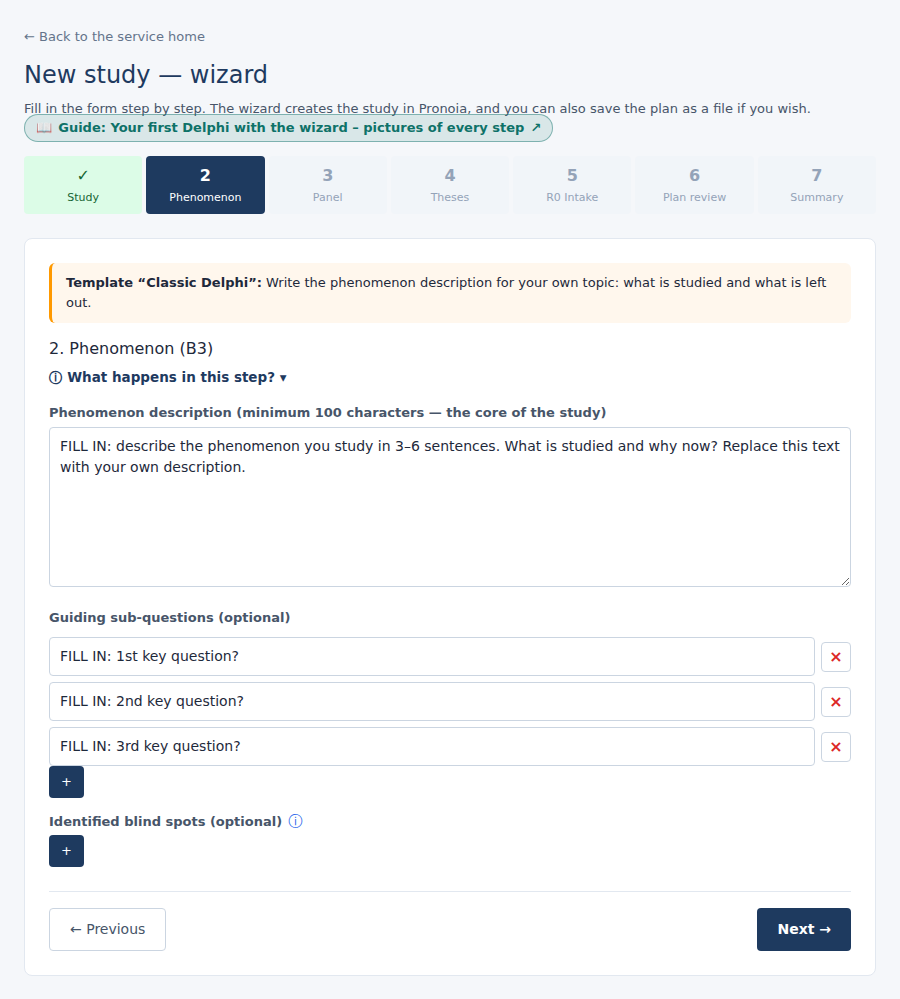
Step 3: Panel
The panel is described as a matrix with two axes: Expertise (what the panelist knows about the phenomenon) and Stake (whom the phenomenon affects). Each axis has categories, and each category has a title and a description. Change the template's categories into the groups of your own field.
Panelists are written as roles, not names – for example "municipal director of education". Names and email addresses are added later in Pronoia's panel view. The panel must include at least one human; AI panelists are optional.
An AI panelist's perspective profile is shown as a chart: the four axes with their names and values, and the other AI panelists as faint dashed outlines, so you can see how far apart the profiles are. Download PNG and Download SVG save the chart with its headings and the poles of each axis, for example for a report or a slide.
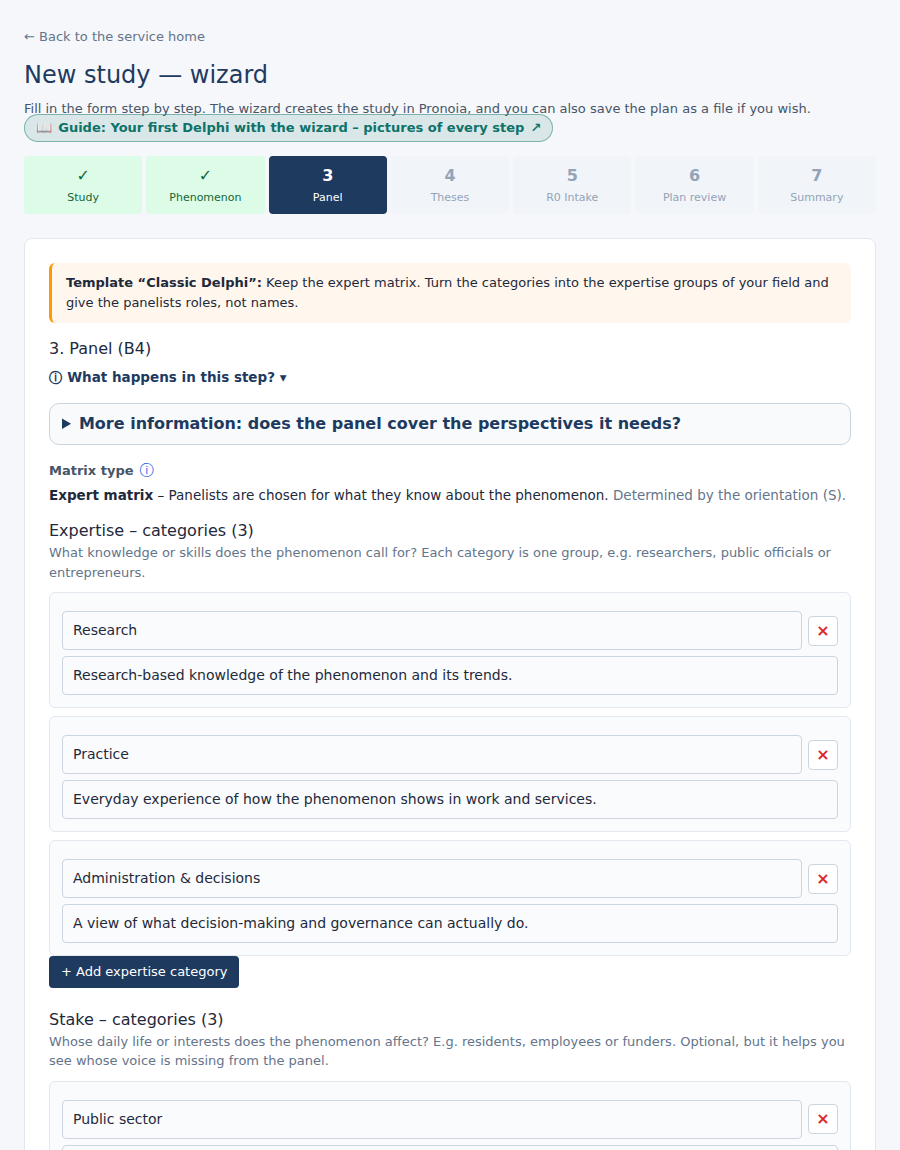
Step 4: Theses
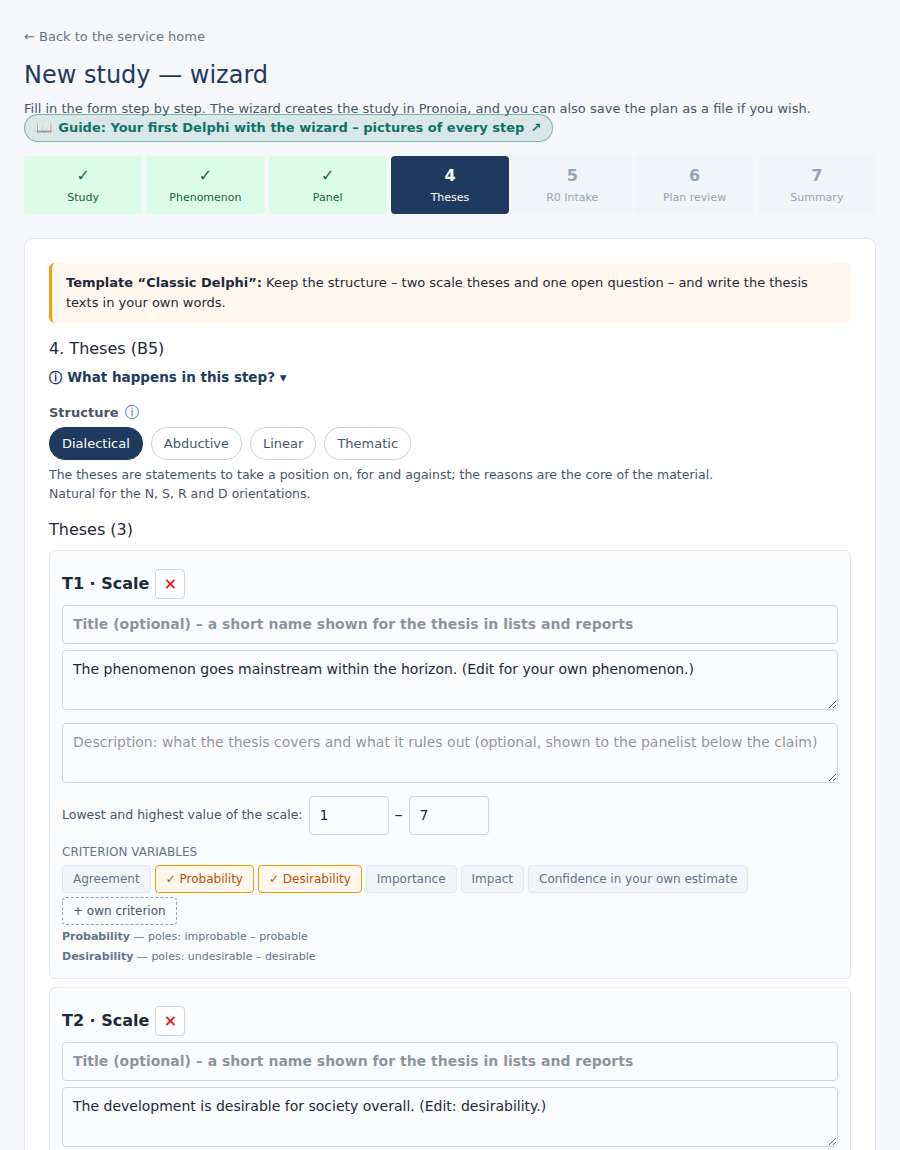
The theses are the statements and questions the panel answers. Keep the template's structure and question types, and write the thesis texts in your own words (at least 20 characters). You add new theses with the buttons at the bottom of the page, for example + Scale or + Open question.
Step 5: R0 Intake
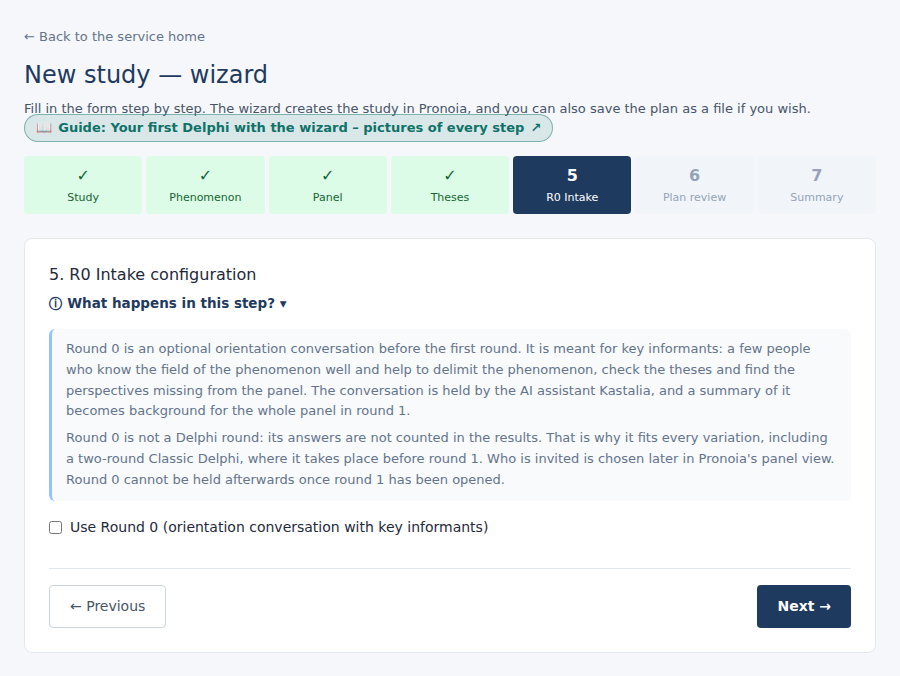
Round 0 is an optional orientation conversation with a few key informants before the first round. It is off by default, and on a first study it is best left off. In the Barometer template, this step also sets the schedule of the measurement waves.
Step 6: Plan review
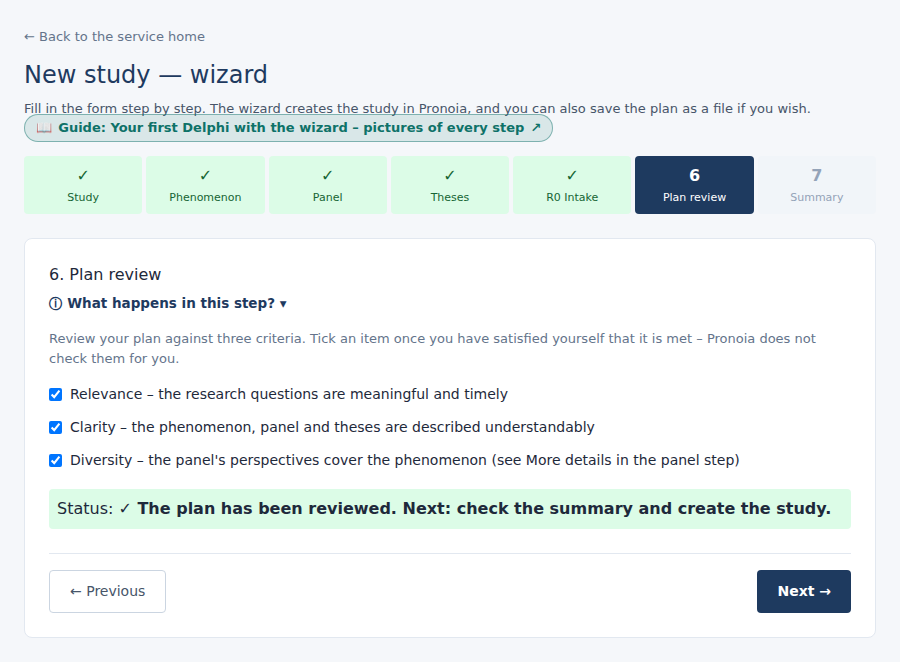
Review your plan against three criteria: relevance, clarity and diversity. Tick a criterion once you have satisfied yourself that it is met – Pronoia does not check them for you. The templates bring the criteria already ticked, so read them through anyway and untick any criterion that is not yet met.
Step 7: Summary and creation
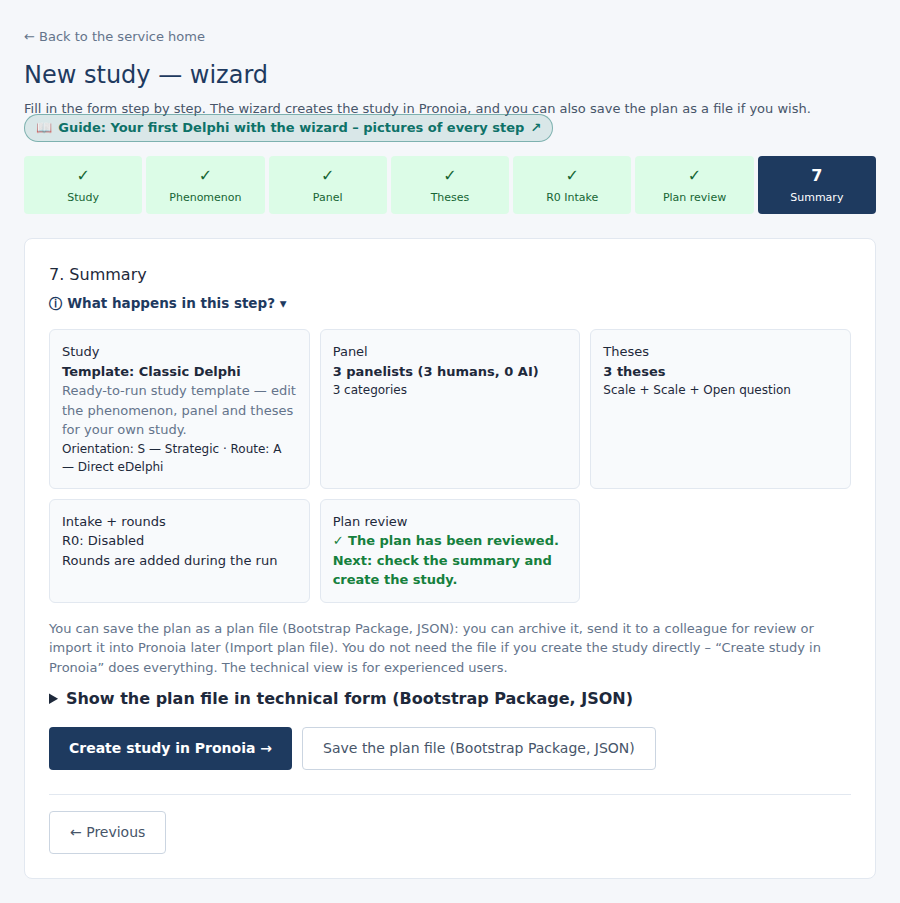
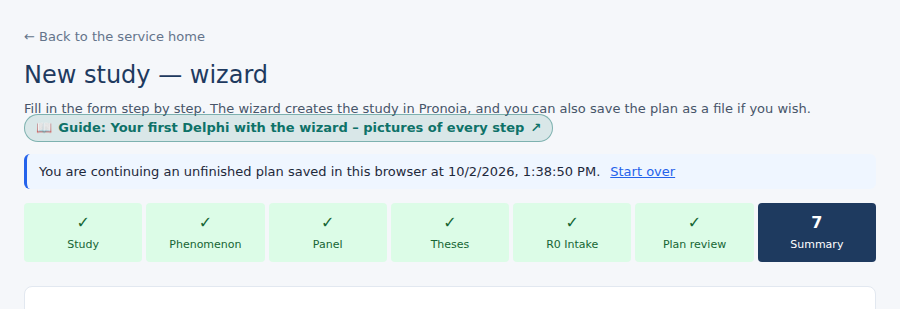
The summary shows the whole plan at a glance. When everything looks right, press Create study in Pronoia →. The study is created at once, and you can open it in the facilitator view.
If you like, you can also save the plan as a file with Save the plan file (Bootstrap Package, JSON) – for an archive or for a colleague to check, for example. You do not need the file if you create the study directly.
If you stop halfway
When you open the wizard again on the same computer and browser, it continues where you left off and tells you when the draft was saved. Start over gives you an empty wizard – the wizard asks you to confirm before the draft is removed.
What next
The study is now in Pronoia as a draft. Next you finish it: confirm the AI mode, fill in the controller, make the theses your own, add the real panelists and create the invite links. This is shown with pictures in Finishing your plan in Pronoia. From opening the round onwards: The facilitator's process, from planning to handover.
From a plan to Pronoia
Planning (DPE) → plan file → Facilitation (Pronoia)
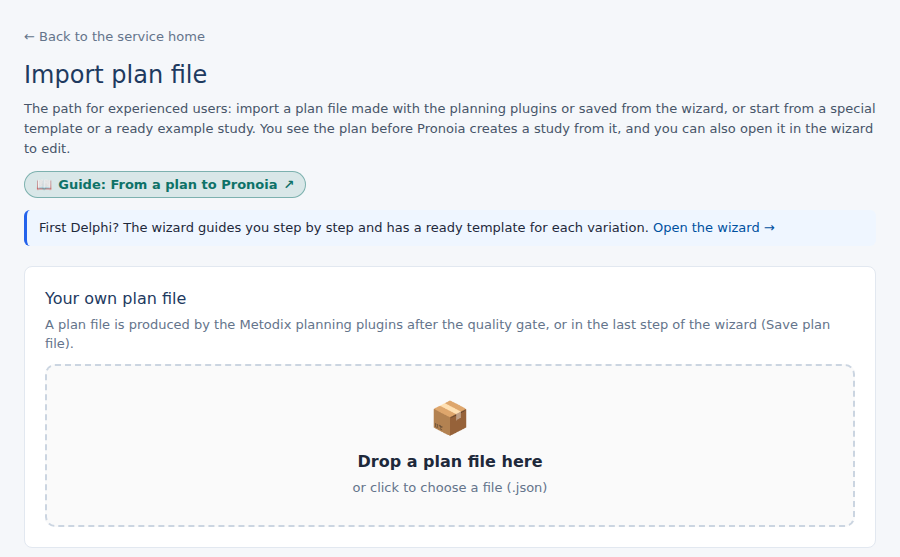
This is the way when the plan already exists – or when you want to start from a special template or a ready example study. Open the page from the dashboard button 📥 Import plan file.
Where a plan file comes from
A plan file (JSON) is the plan in machine-readable form. It comes about in two ways:
- With the planning plugins. Type
metodixin Claude and choose planning. When planning asks for the target platform, choose Pronoia. After the quality gate, planning produces a plan file that you save on your computer. - From the wizard. The wizard's last step has the button Save the plan file (Bootstrap Package, JSON).
The planning plugins are for Metodix's licensed partners. If you do not have them yet, Metodix will give you the installation instructions.
Import your own file
Drop the file on Your own plan file, or click to choose it. Pronoia checks the plan at once and shows a preview. Nothing is created yet.
Or start from a template
At the bottom of the page there are two sets of templates:
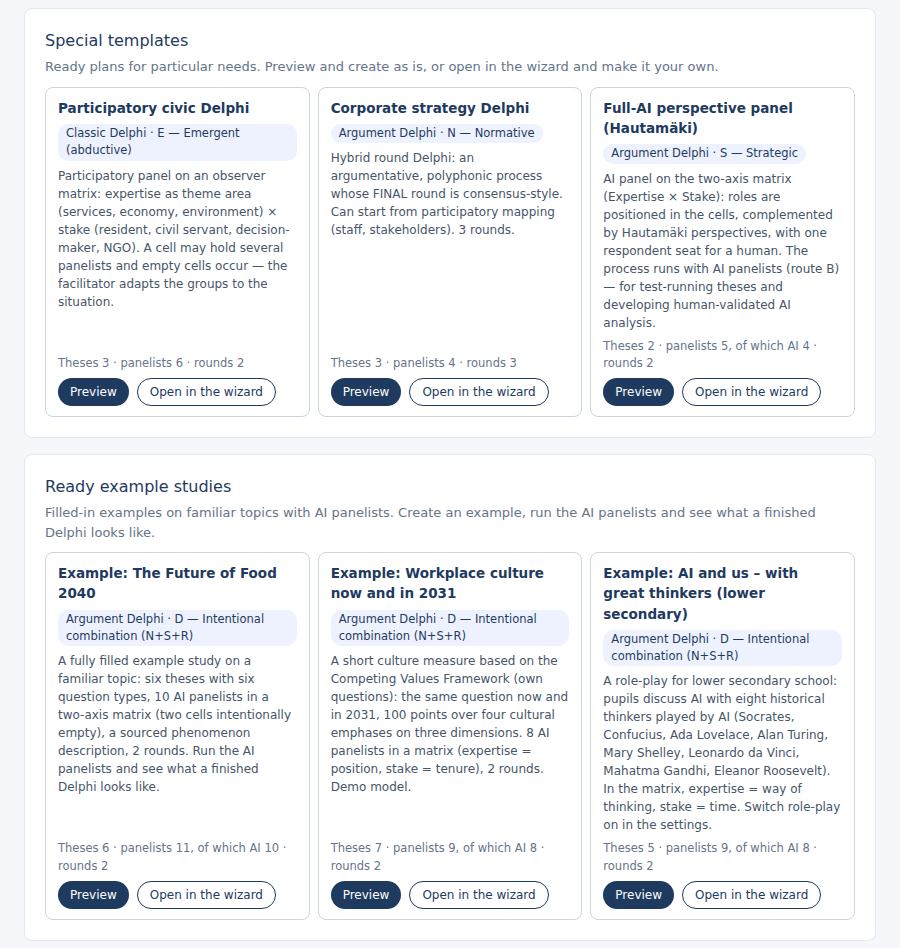
- Special templates – ready plans for particular needs: a participatory civic Delphi, a corporate strategy Delphi and a perspective panel made up entirely of AI panelists.
- Ready example studies – filled-in examples on familiar topics with AI panelists. Create an example, run the AI panelists and see what a finished Delphi looks like.
Each template card has two buttons: Preview leads to the same preview as your own file, and Open in the wizard opens the template in the wizard for editing.
Read the preview
The preview tells you whether the plan is in order and shows it with the same names as the wizard: study, phenomenon, panel, theses, rounds and Plan review. Notes do not prevent creation; if the plan needs fixing, the create button stays grey and the reasons are listed.
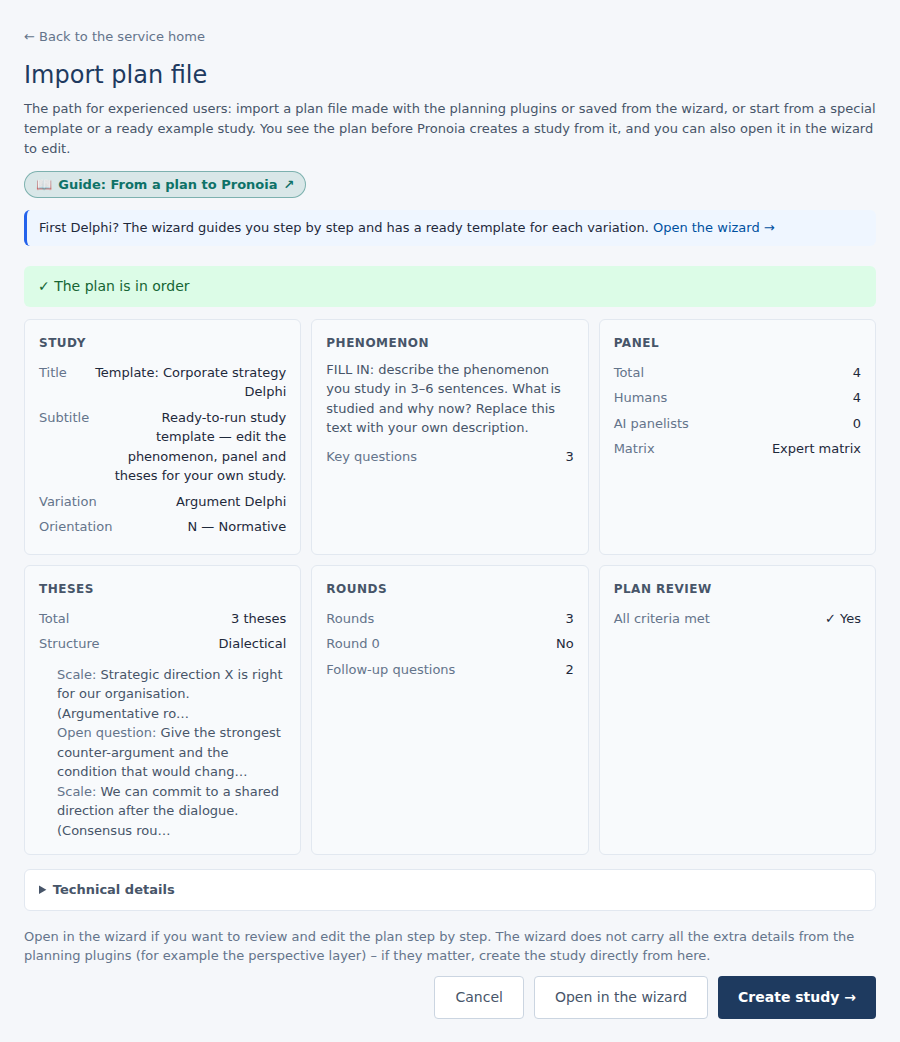
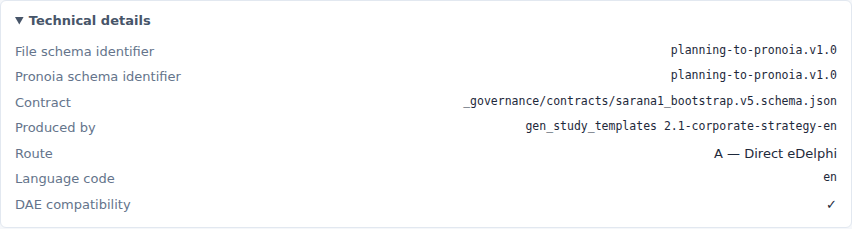
The Technical details are folded below the preview. Open them when you check a file from the planning plugins: they hold the file's schema identifier, producer, route and language code, and the perspective layer figures if the plan has one.
Create the study – or open it in the wizard
Below the preview there are three choices:
- Create study → creates the study directly from the plan. Everything in the file goes into Pronoia.
- Open in the wizard opens the plan in the wizard, where you can go through it step by step and edit it before creating the study. The wizard does not carry all the extra details from the planning plugins (for example the perspective layer) – if they matter, create the study directly.
- Cancel goes back to the start.
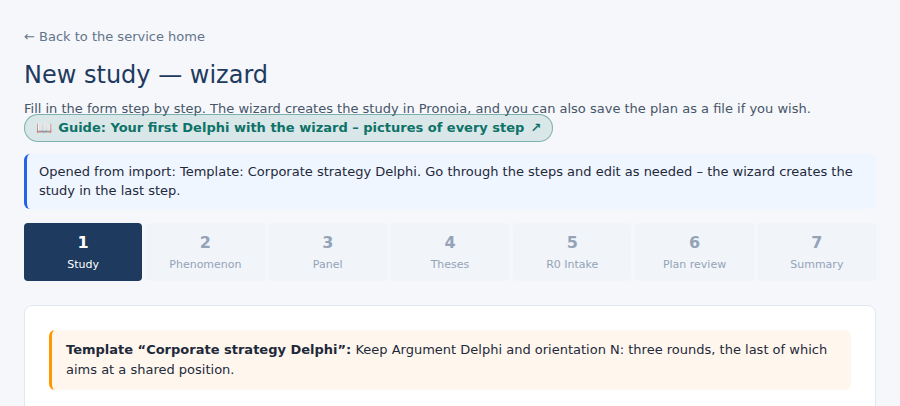
If the wizard has an unfinished draft, the page first asks whether to replace it. The wizard shows at the top where the plan came from.
The same plan twice
If the same plan file has already been imported, the page says so and asks whether to create a new parallel study anyway: Create a new study or Don't create. A plan is sometimes run again on purpose, so the import does not prevent it.
After creation
Once the study has been created, press Open the study →. If the file had fields that have no counterpart in Pronoia, they are listed under Fields with no receiver – the import still succeeded. The study is a draft that you finish before the panel can be invited: Finishing your plan in Pronoia. From there the work goes on as with any study: The facilitator's process, from planning to handover. The whole arc from planning to analysis: Integration: Plan → Pronoia → DAE.
Finishing your plan in Pronoia
Facilitation (Pronoia)
Once the study has been created with the wizard or imported as a plan, it is a draft in Pronoia. The template has filled in a frame: the description, the rounds, the panel roles and the theses. Some things, however, are always left to you, because they are facts about your study that a template cannot know.
This guide takes the draft to the point where the panel can be invited to the first round. Set aside half an hour to an hour – most of it goes into the theses and the panelists.
Where you start
On the wizard's last screen, press Open in facilitator view →. On the import page the same button is Open the study →. Both screens also link to this guide.
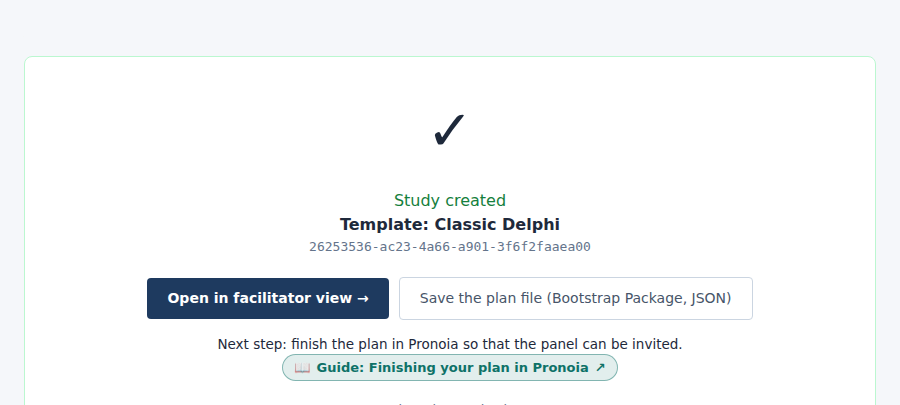
Later you reach the study from the left side of the dashboard, under Studies.
What now? and the four areas
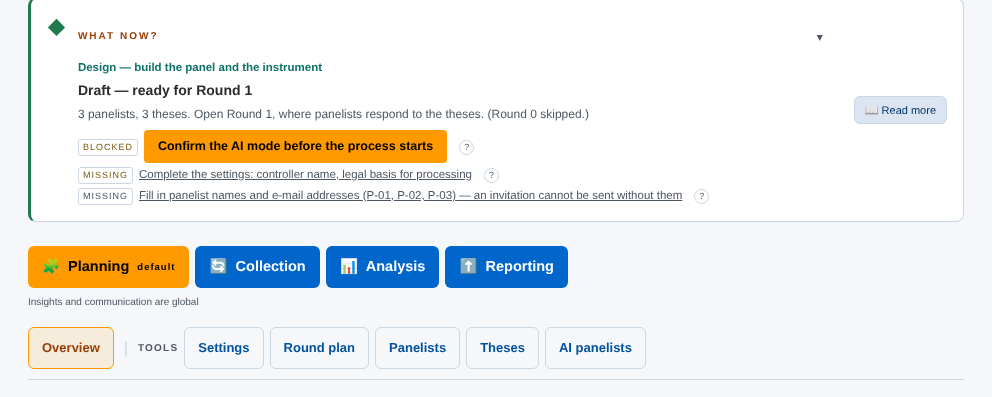
At the top of the facilitator view is the What now? card. It tells you which stage the study is in and lists what blocks progress (BLOCKED) and what is still missing (MISSING). The link on each row takes you straight to the place where the item is fixed.
Below the card are the study's four areas: Planning, Collection, Analysis and Reporting. In this guide you work almost entirely in Planning. Its tools are Overview, Settings, Round plan, Panelists, Theses and AI panelists.
Next to each view's heading is a label saying what a change applies to, for example Applies to: the study or Applies to: round 1. It tells you whether you are changing the whole study or one round.
Overview: what is still missing
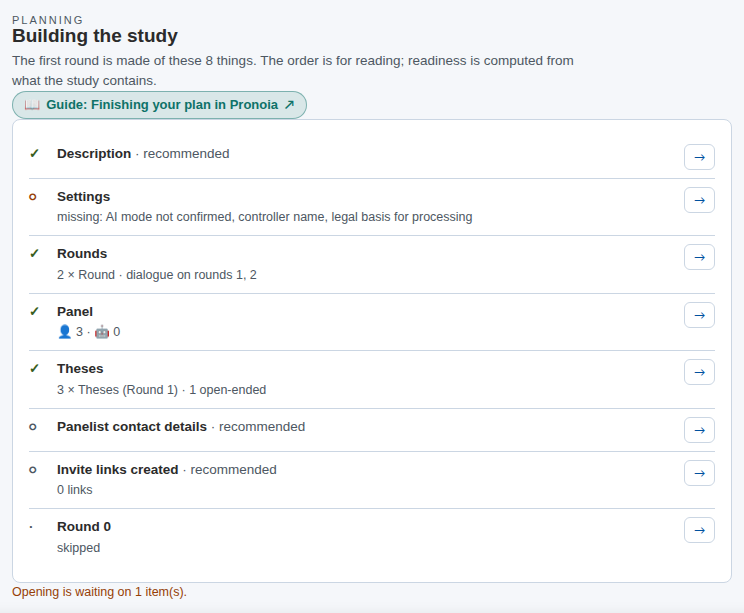
Overview is a list headed Building the study. Pronoia computes it from what the study contains – you do not tick it yourself.
- ✓ means the item is in place.
- ○ means something is missing from the item.
- · means a decision, not a gap (for example whether Round 0 is run).
- The label recommended means the item does not block opening, but it is worth taking care of.
Below the list it says how many blocking items are open: Opening is waiting on 1 item(s). The → button on a row takes you to the view where the item is fixed.
What came from the template, what is left to you
| Item | From the template | Your task |
|---|---|---|
| Description | the template's generic text and FILL IN text | title, description and phenomenon for your own topic |
| Settings | orientation, language, AI mode | confirm the AI mode, controller, legal basis |
| Rounds | the template's number of rounds | check the number and Round 0 |
| Panel | roles in the matrix (P-01, P-02 …) | fill the cells where a viewpoint is missing |
| Theses | example theses | write theses for your own phenomenon |
| Panelist contact details | – | real names and email addresses |
| Invite links created | – | create the links once everything else is ready |
The order is up to you. Below, the items are covered in the order that is usually most natural.
1. Make the basics your own
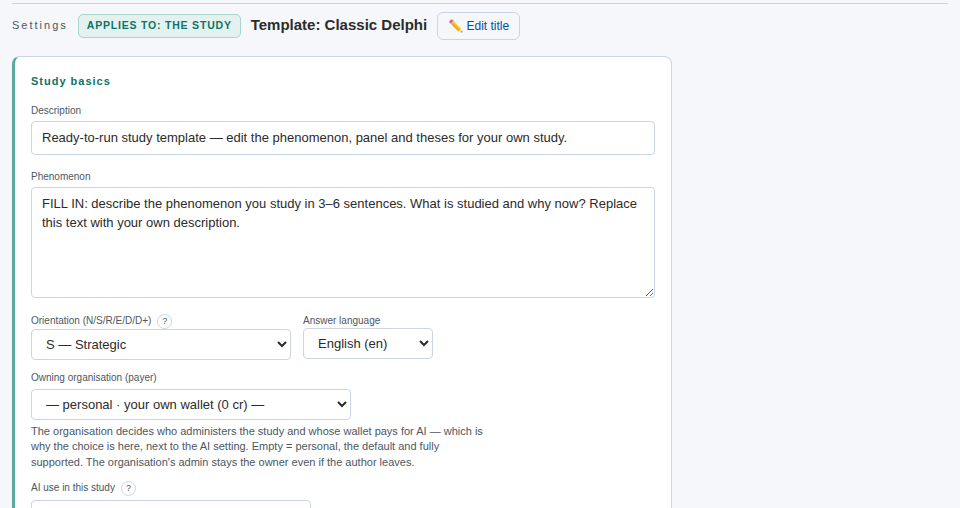
Open Settings. At the top is Study basics:
- Edit title opens a window where you change the study's name. A template's name begins with Template: – change it, because the panelists see the name in the invitation.
- Description is a one-sentence introduction.
- Phenomenon is the core of the study: what is studied and why now. Replace the template's FILL IN text.
- Attachments for panelists is optional: for example a one-page introduction to the panel. Panelists see the attachments on the card that introduces the study.
Changes are saved automatically: after a moment the end of the form reads Saved at hh:mm.
2. Confirm the AI mode
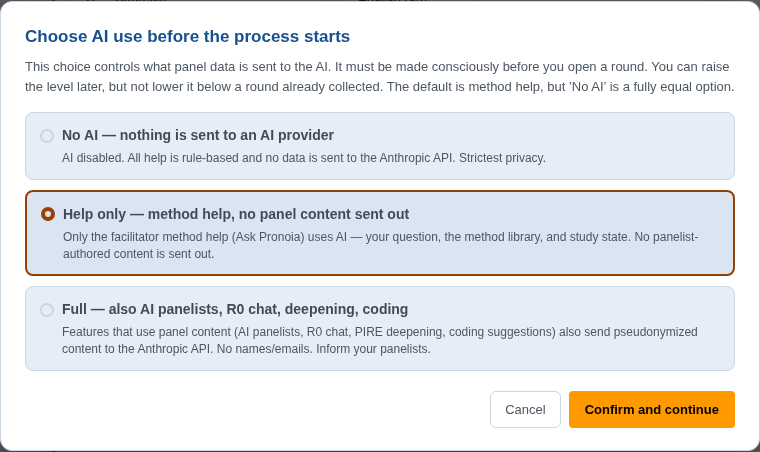
The first round cannot be opened until you have consciously chosen what AI may do in the study. Under AI use in this study, press Confirm the AI mode. Choose one of three:
- No AI — nothing is sent to an AI provider
- Help only — method help, no panel content sent out (default)
- Full — also AI panelists, R0 chat, deepening, coding
Press Confirm and continue. Afterwards the section says The AI mode is confirmed. If you later change the mode, you confirm it again.
3. Controller and legal basis
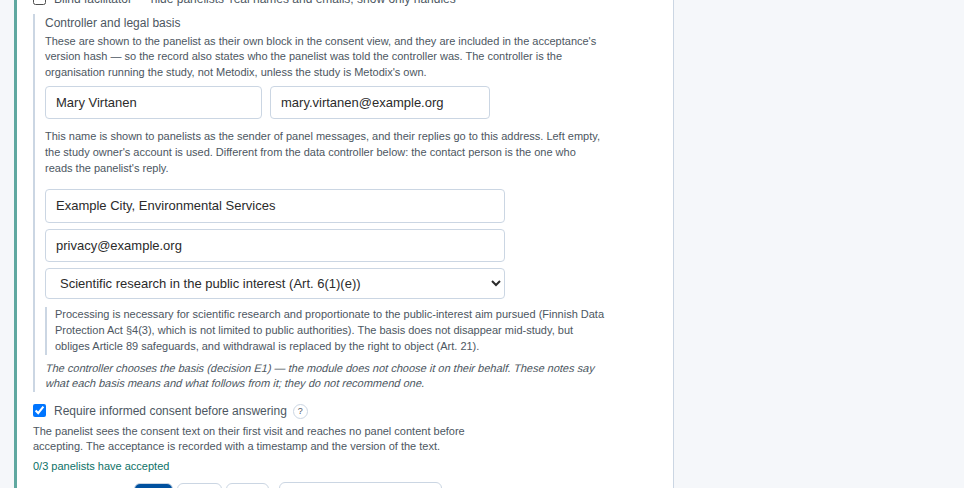
In the template, Require informed consent before answering is already switched on: the panelist accepts the consent text before seeing any panel content. That is why invite links cannot be created until Controller and legal basis has been filled in:
- Contact person's name and Contact person's email – you, or whoever answers the panelists' messages. Left empty, your own account details are used.
- Controller's name and Contact details – the organisation that carries out the study.
- Legal basis for processing – choose from the list. Under each basis is a note on what it means.
The Consent text is ready in three languages. You do not need to write it unless you want your own wording.
There is no need to save. Once the fields are in place, the Settings row in the overview turns ✓.
4. Rounds
Open Round plan and press Edit phasing. Here you decide two things:
- Round 0 – whether an orientation is run before the first round, in which key informants discuss the phenomenon. In the template it is off (No). Choose Yes if you want to hear the panel before the theses are fixed.
- Actual rounds – usually two or three. Reserve one too many rather than too few: an unused round costs nothing.
The path shows the whole arc from planning to the end. Press Save.
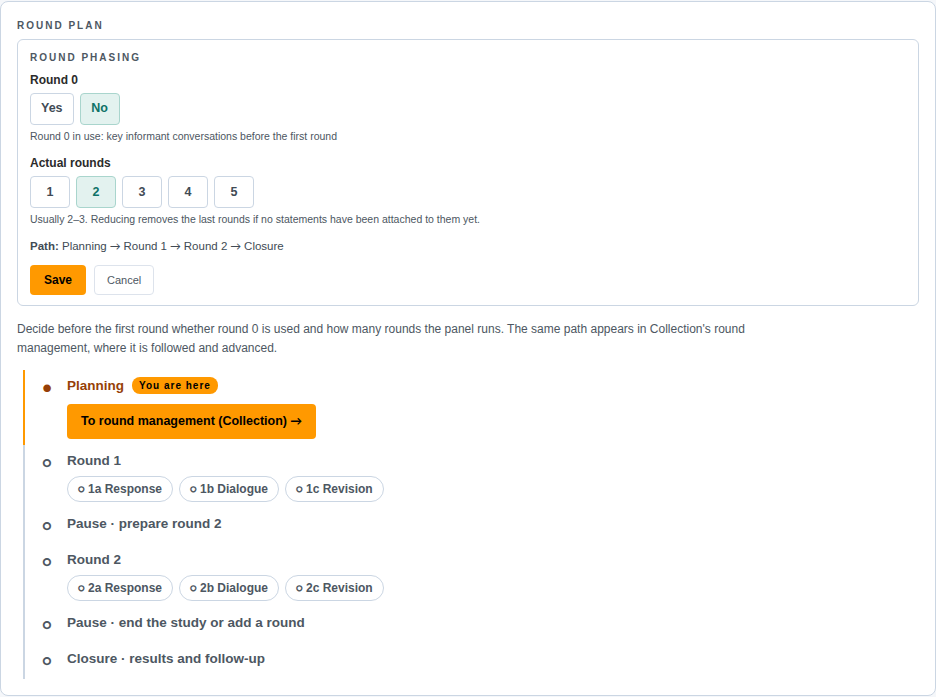
If you switch Round 0 on, its orientation questions are set on the Collection tab Round 0. More on that in The facilitator's process, from planning to handover.
5. Make the theses your own
Open Theses. At the top is a form for a new thesis, and below it the theses of round 1. The template's theses are written in general terms and include an instruction in brackets, for example (Edit for your own phenomenon.)
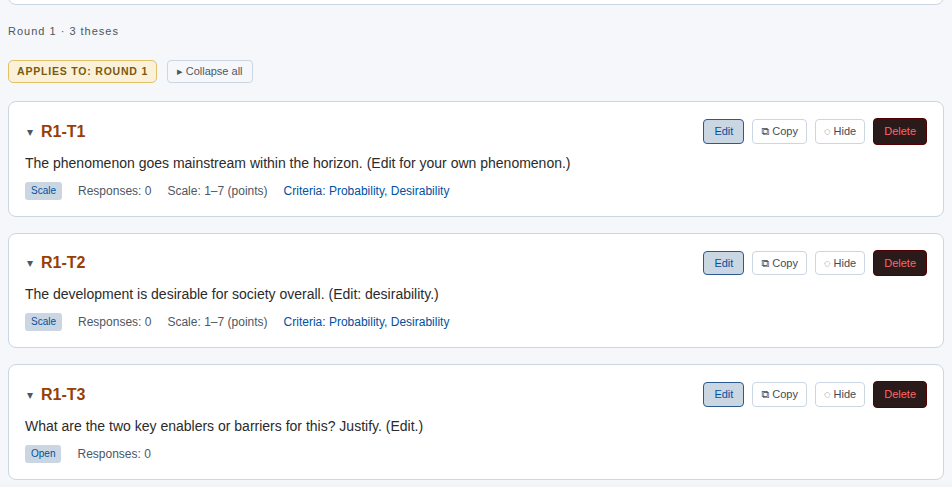
Press Edit on a thesis and write your own. In the same form you can add an explanation and adjust a scale thesis's criteria, such as probability and desirability. Preview: how a panelist sees this question shows the thesis through a panelist's eyes. Press Save.
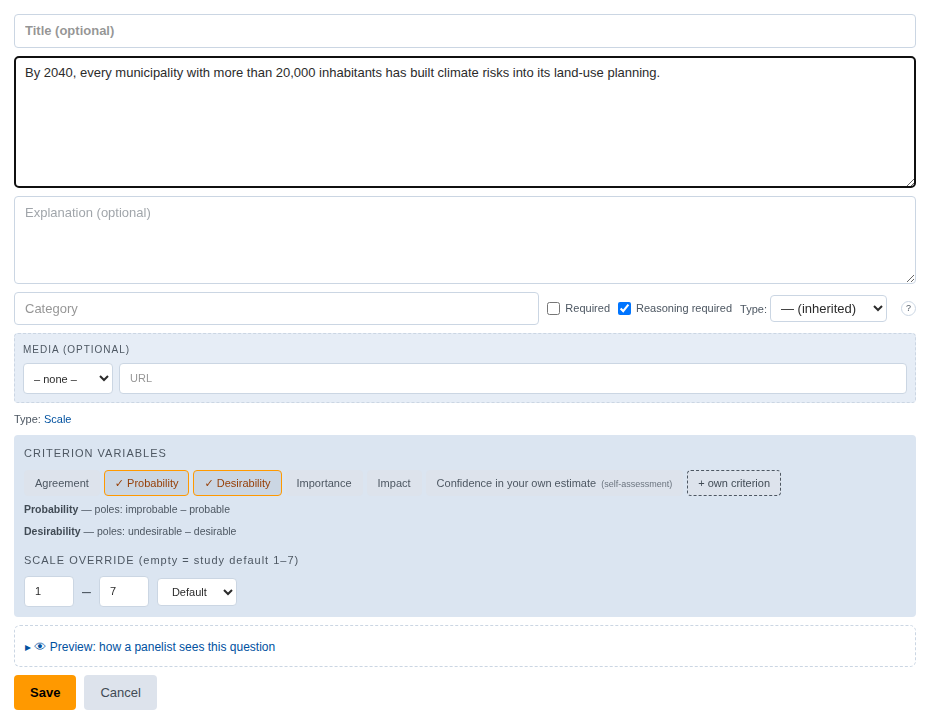
You add a new thesis with the form at the top and the + Add button; there you also choose the thesis type, for example Scale or Open. A template thesis you do not need can be deleted (Delete) or hidden (Hide).
6. Panel and panelists
Open Panelists. At the top is the panel matrix: the template's roles (P-01, P-02 …) are placed in cells by expertise and stake. Below the matrix, PANEL COVERAGE shows how well the viewpoints are covered: Coverage score, Missing viewpoints (empty cells) and, when needed, the warning Panel supplement recommended before the round.
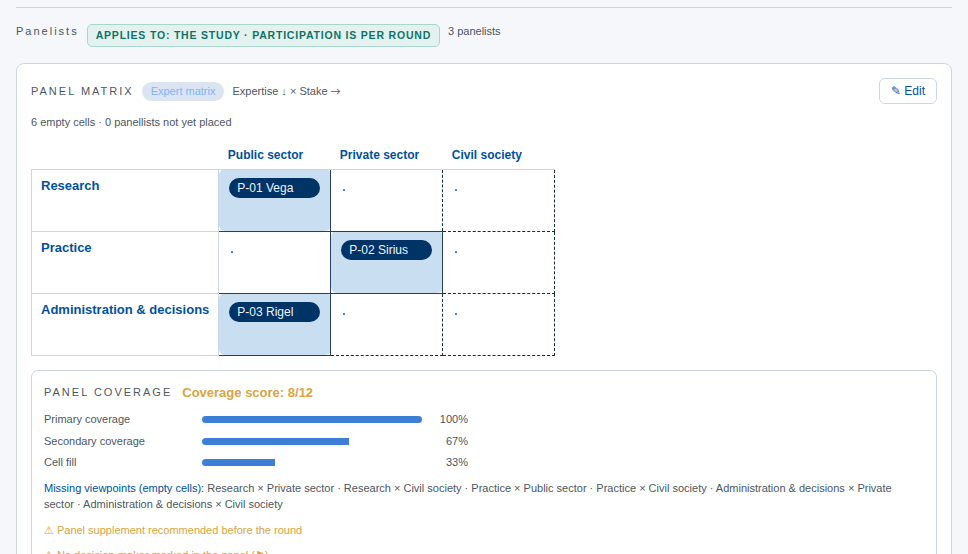
The template's roles are places, not people. Press Edit on each one and enter the real person's name and email. On the same row you can check the cell and mark the person as a decision-maker (Decision-maker). Press Save.
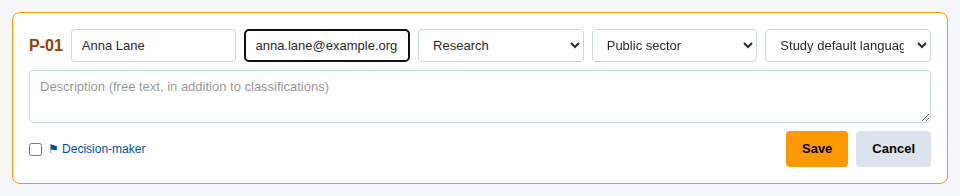
Add new panelists with the form in the view and the + Add button – especially to the cells where a viewpoint is missing. A panelist without an email address cannot be invited, so the Panelist contact details row in the overview turns ✓ only when everyone has contact details.
Try as panelist shows the study as a panelist sees it.
7. AI panelists (optional)
If you chose Full as the AI mode, you can add AI panelists on the AI panelists tab: Create 5 default profiles, Generate profile suggestions from the phenomenon, or Import Planning Handoff. AI panelists are always marked in the panel. In a first study they are not needed.
8. Invite links
When everything above is in place, go to the Collection area and open Invitations. Press Write and send the invitation letter →. Pronoia creates a personal link for each panelist and opens a ready invitation in Communication, addressed to the panel's human panelists. Nothing is sent until you press Send there – sending is covered in the next guide. If you only want to create the links, Generate invite links does that without opening a letter.
You do not see the links themselves. A new study is in closed link mode: each link travels only in the letter to its own panelist, and the screen just says that the links have been created. The button next to the letter shows how many there are, for example ✓ Invitation links created (3) – create missing. Closed mode protects the panelists' anonymity, and it is the recommended setting.
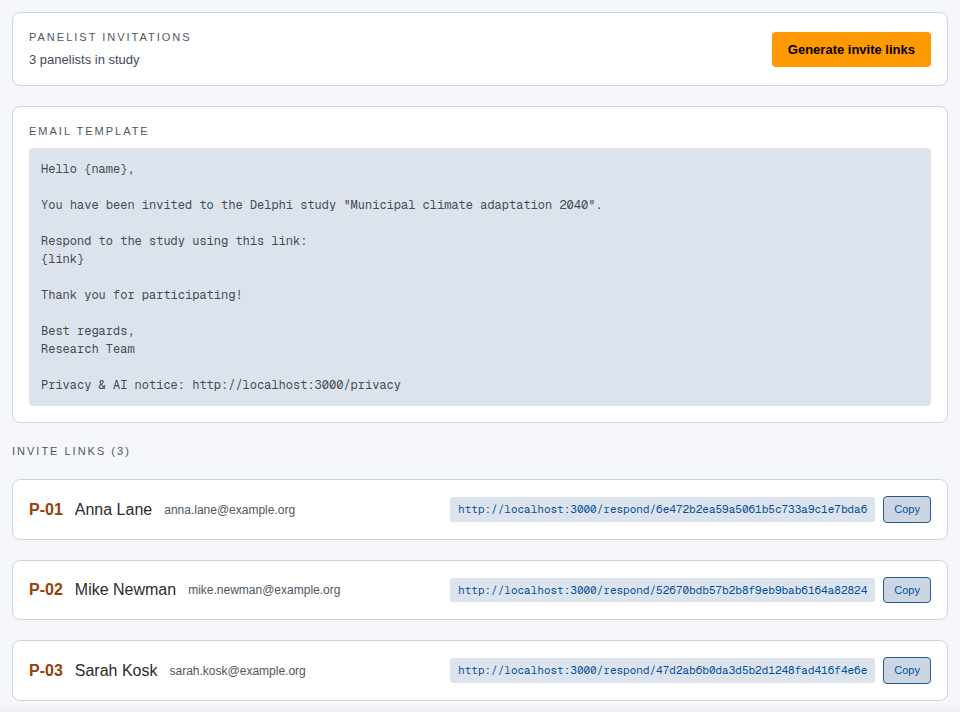
If you would rather send the invitations from your own email, choose Open in Settings under Facilitator access to panelists’ response links. Invitations then shows each panelist's link, Copy copies it to the clipboard, and EMAIL TEMPLATE gives a message in which you replace {name} and {link} with each panelist's details. In blind mode the links are always closed.
Creating the links does not yet send anything or open the round.
Ready to invite
Go back to Overview in the Planning area. When the list is in place, it says Everything that blocks opening is in place. below it, and the What now? card suggests Move to the response phase next.
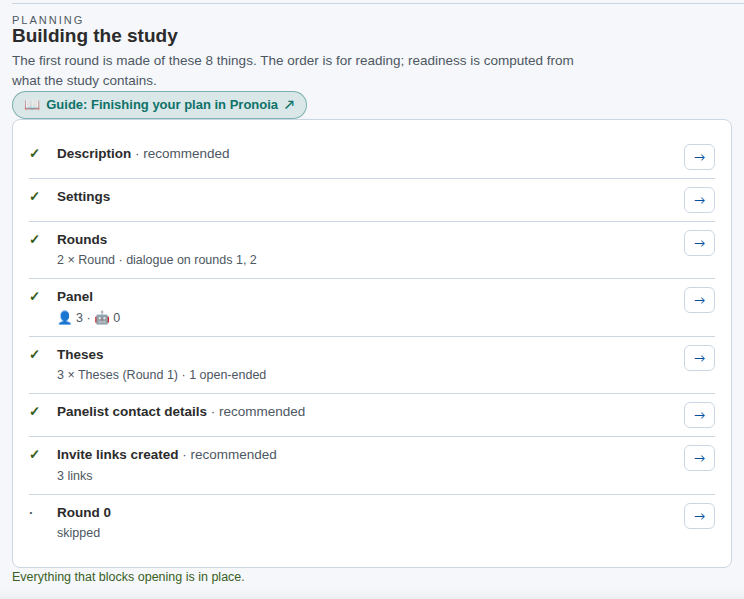
The plan is now ready. Opening the first round, sending the invitations and following the collection are the subject of the next guide: Your first round in Pronoia.
Remember
- Nothing is locked. Theses, panelists and settings can still be edited between rounds – the guide simply follows the order in which the first round comes together.
- The list is computed. If a row stays ○, press its → button: it takes you to the place where the item is fixed.
- Practise safely. You can rehearse on an example study before your own: The facilitator trial in five stages.
Your first round in Pronoia
Facilitation (Pronoia)
The previous guide ended with the plan ready and the What now? card suggesting the response phase next. This guide carries on from there. In it you open round 1, invite the panel, follow the responses and the dialogue, close the round and prepare round 2.
The main path is Argument Delphi, Pronoia's signature variation: the panelists rate the theses and justify their ratings, then read each other's justifications and discuss them. The differences in the other variations are at the end of the guide.
A round usually lasts 1–3 weeks. Your own work in it is an hour or two: opening and invitations at the start, a check every few days, and closing at the end.
How a round runs
Everything in this guide is done in the Collection area. Its tabs are Situation, Round management, Invitations, Facilitation, Communication and Responses.
In Argument Delphi, round 1 runs like this:
| Phase | What the panel does | What you do |
|---|---|---|
| 1a Response | rates the theses and justifies the ratings | send invitations, follow responses, remind |
| 1b Dialogue | reads the others' justifications, comments, refines its own | follow the discussion and pick material |
| Pause | does not answer | read the results and build round 2 |
The path also shows the phase 1c Revision marked ↺ during the dialogue. In Argument Delphi the panelists revise their ratings during the dialogue, and there is no separate revision phase.
All transitions are made with the same orange button on the Round management tab. Pronoia does not move the round on by itself, and the deadline does not close the round.
1. Before opening: deadline and visibility
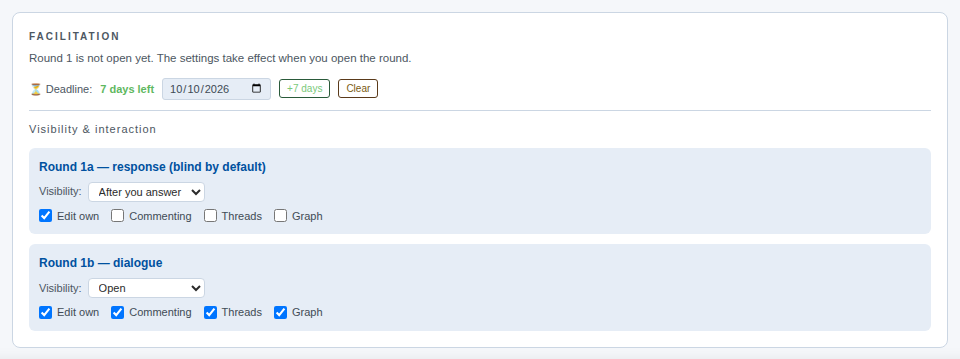
Open Collection › Facilitation. The top line says that round 1 is not open yet and that the settings take effect when you open the round.
- Deadline is a date the panelists see. It does not close the round; it reminds you and the panel. +7 days moves it a week on, Clear removes it.
- Visibility & interaction sets, separately for each phase, what a panelist sees. The template's default suits most studies: in the response phase a panelist sees the others' responses only after giving their own (After you answer), and in the dialogue phase everything is open (Open). The checkboxes (Edit own, Commenting, Threads, Graph) allow or block single actions.
2. Open round 1
Open Round management. The path shows the whole course from planning to closure, and the You are here label tells you where you are. The orange button is always the next step. Now it is Open round 1.
On the card's INFORMING AND INTERACTION row, the buttons Write to the panel and Invites and links lead to the same actions as the Communication and Invitations tabs.
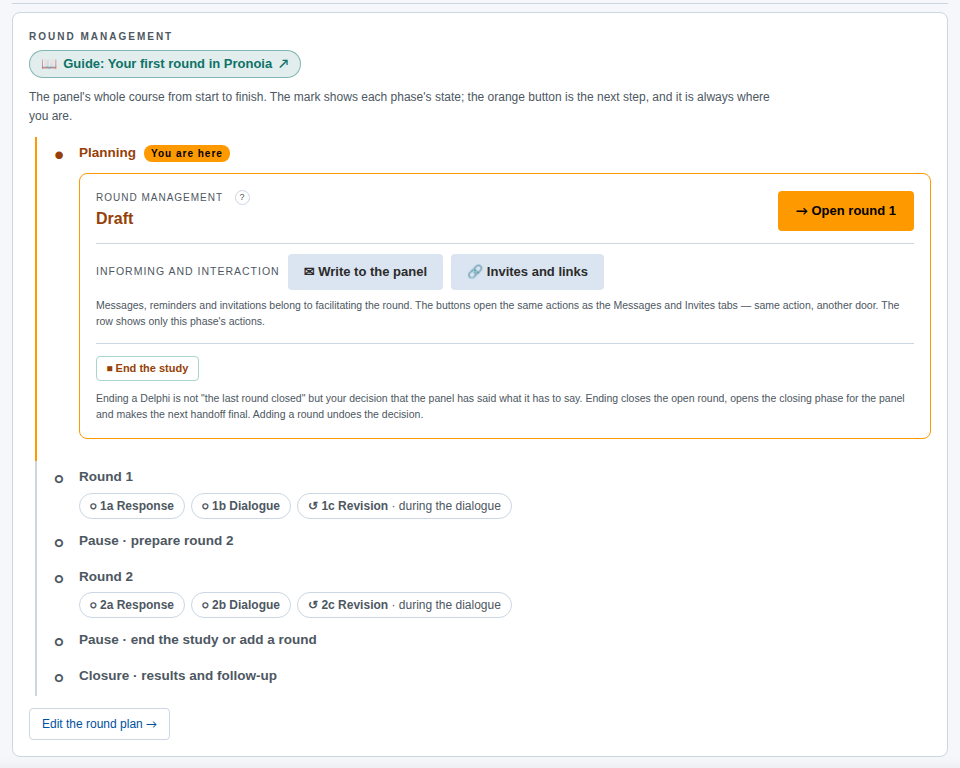
Press Open round 1. The round is now open and the phase is Response. The card shows the number of responses (at first 0 / 9 – three panelists times three theses), and the orange button changes to the next step, Move to the dialogue phase.
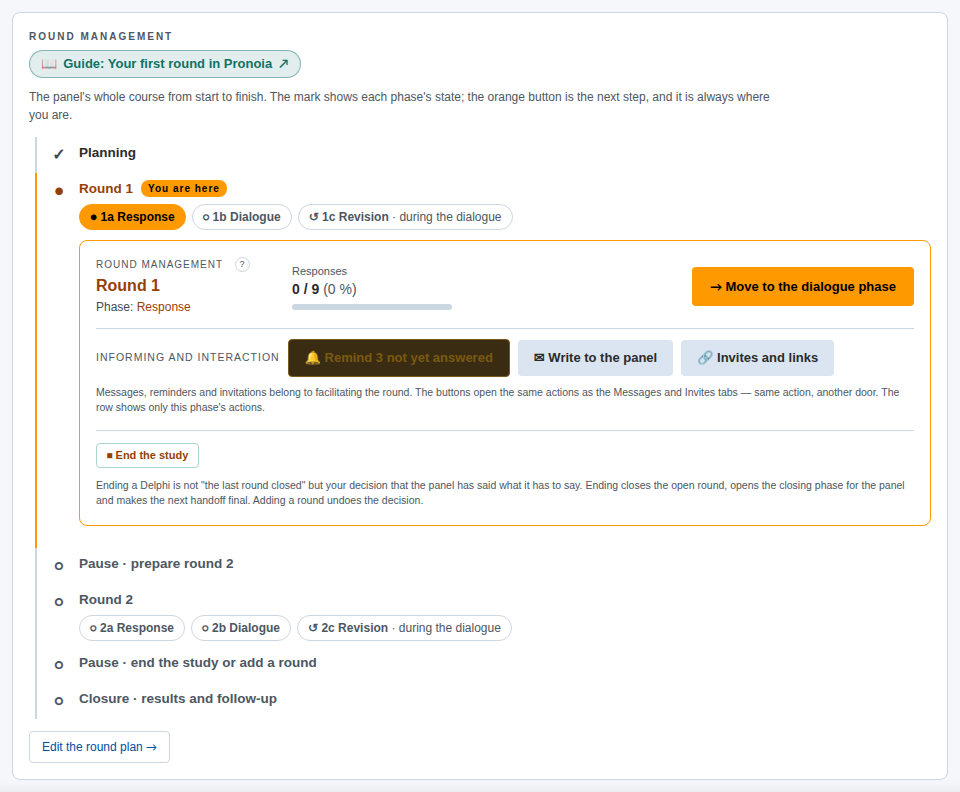
Opening does not yet send anything to anyone, and it does not use credits. The panelists hear about it only when the invitations go out. That is why the reminder button is still dimmed (Remind 0 not yet answered), and the note beside it says that three panelists have not been invited yet.
3. Invite the panel
There are two ways to send the invitation.
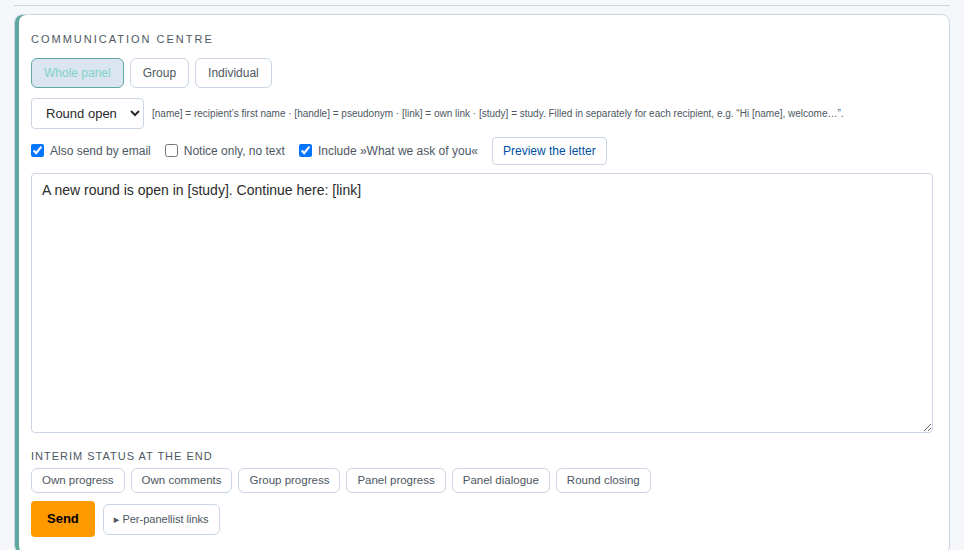
Through Communication (recommended). Open Communication. In the COMMUNICATION CENTRE the recipient is Whole panel. Choose the Invitation to the study template. If you come to Communication from the button on the Invitations tab, the template is already selected and email is switched on. The letter comes with ready text and placeholders: [nimi] is replaced by the panelist's first name, [link] by their own link and [study] by the study's name. The short Round open template is meant for later rounds, when the panelists already know the study.
- Also send by email takes the message to the panelists' inboxes. Without it the message appears only in Pronoia.
- Include »What we ask of you« adds a short description of what is expected of the panelist to the letter.
- Preview the letter shows the letter exactly as it will go out, and sends nothing.
Finally press Send. The delivery report tells you how many inboxes the message reached and who had no address.
The links yourself. This needs open link mode, which you choose in Settings (see Finishing your plan in Pronoia); in the default closed mode the links are not shown. In open mode, open Invitations. There each panelist has a personal link, which Copy copies to the clipboard. The link is personal, so do not send the same link to two people.
4. What the panelist sees
The panelist opens their link and first accepts the consent text (I have read this and I take part). Then they press Start answering → and see the theses one at a time.
In Argument Delphi a scale thesis is rated on two criteria, for example probability and desirability, on a scale of 1–7. A justification is required. In open theses the panelist writes an answer, for example the strongest counter-argument. Skip question leaves the thesis out.
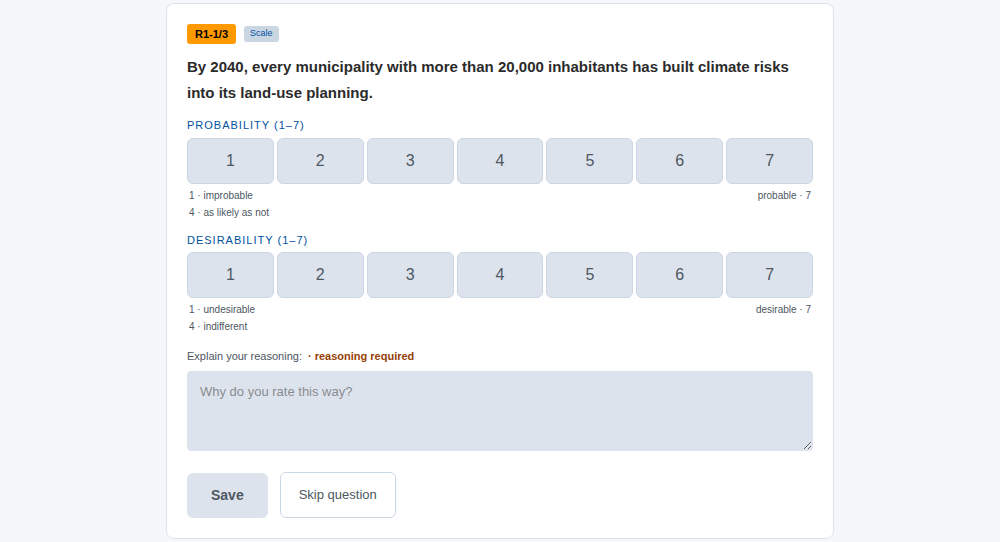
The panelist sees everything under a handle (Aristonike in the picture), and the other panelists see them only by it. As the facilitator you also see the code (P-01).
5. Follow the responses
Situation shows at a glance where the round stands: the number of responses, justifications, panelists who have answered, comments and visits. What do the figures mean? explains each figure.
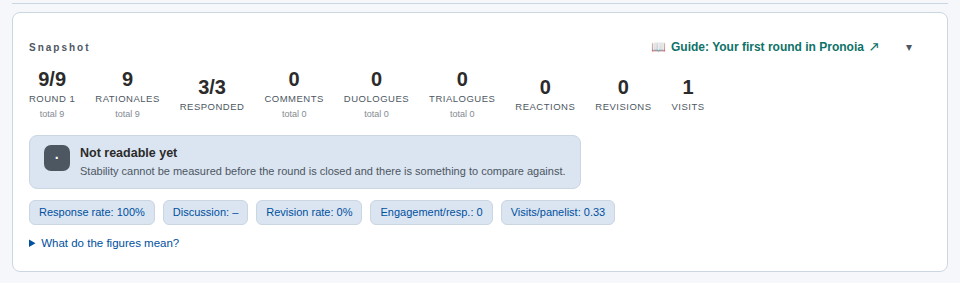
If responses are slow, the button Remind 3 not yet answered on the Round management card sends a reminder to those who have not answered yet (the figure is the number of people who have not answered). The same works on the Communication tab with the Reminder template.
The responses themselves are on the Responses tab, thesis by thesis: who answered, with which values and with which justification.
6. The dialogue phase
When there are enough responses, press Move to the dialogue phase on the Round management tab. If many responses are missing, Pronoia first asks whether you really want to move on.
Dialogue does not close answering: a late panelist can still respond. Now each panelist sees, for every thesis, their own response, the panel's distribution and the others' justifications anonymously. They can comment on the justifications, reply to comments and change their own rating with Edit. In Argument Delphi this is the most important phase of the round: changing a rating in the light of another's justification is the point of the method.
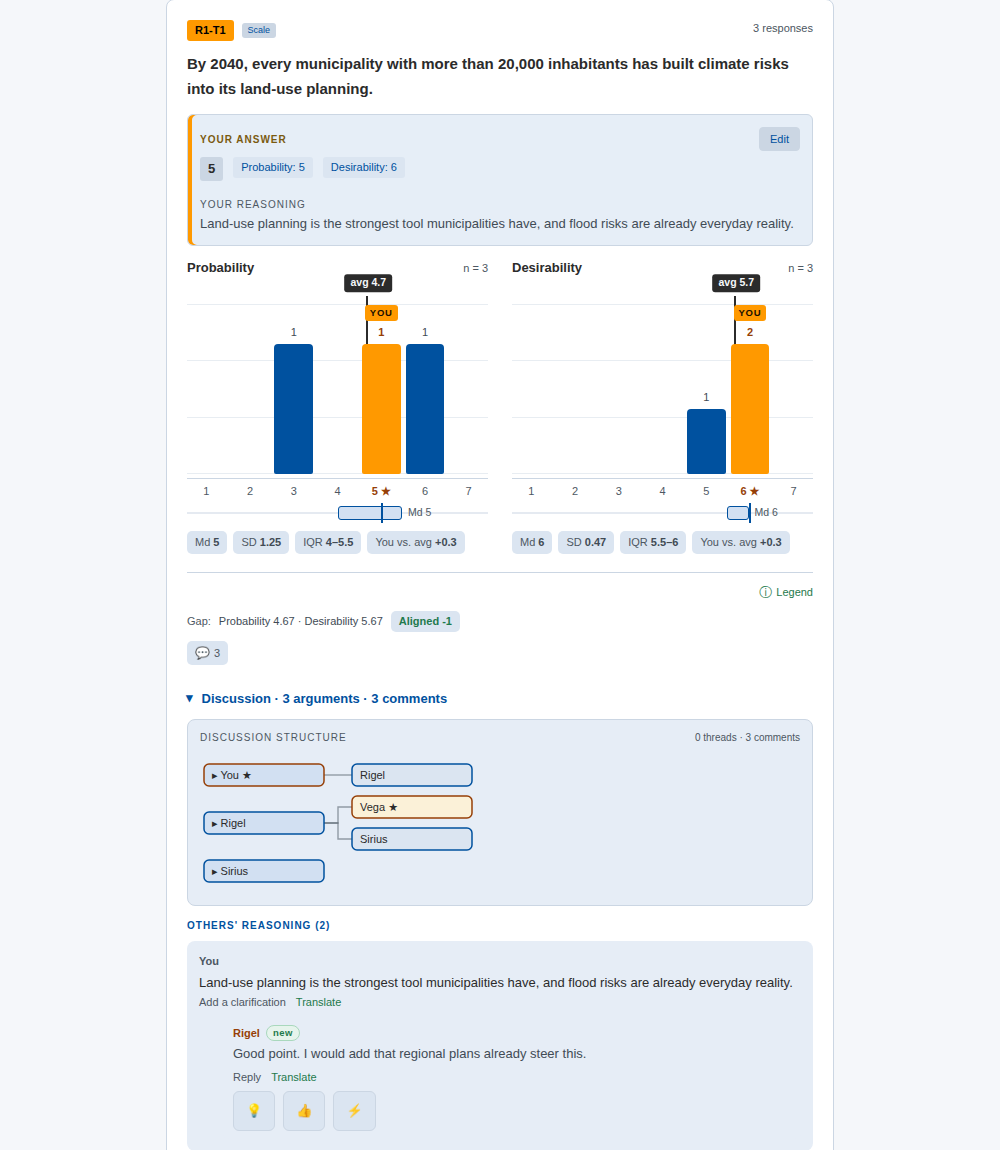
As the facilitator you stay outside the discussion. If you want to tell the panel something, use the Communication tab rather than commenting on justifications yourself.
If you moved the round to dialogue too early, Back to the previous phase restores the response phase. The step back is recorded in the study's log.
7. Pick material for round 2
The Responses tab gathers the round: at the top the numbers of panelists and responses, below that every thesis with its responses.
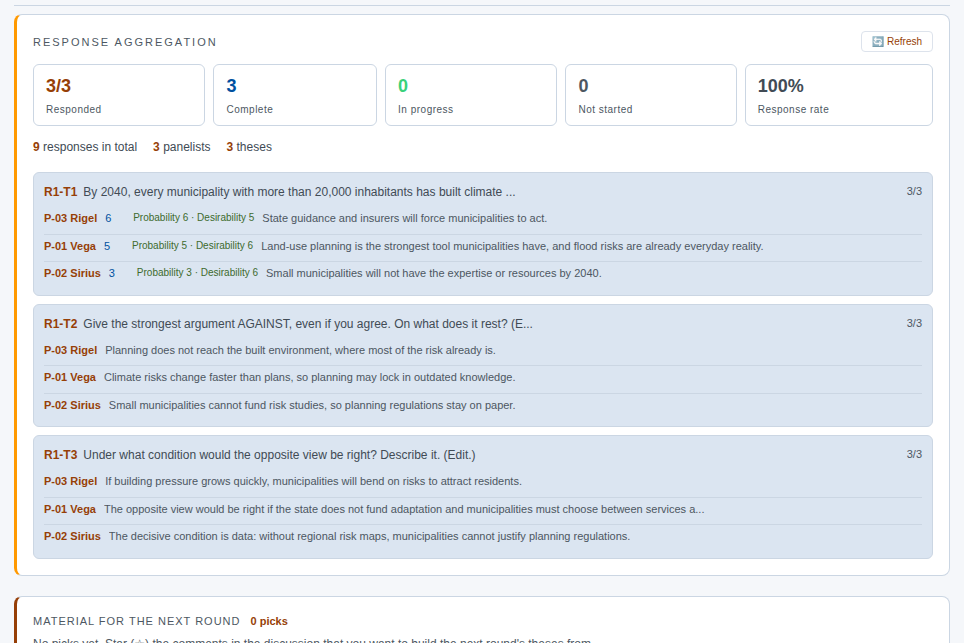
Further down is a timeline, where justifications and comments appear from newest to oldest. When you notice a justification or a comment that could become a round 2 thesis, mark it with a star (☆). The pick goes to MATERIAL FOR THE NEXT ROUND, and in the field Why did you pick this? Visible only to you — in the basket and in the thesis sources, never to the panel. you can write yourself a note.
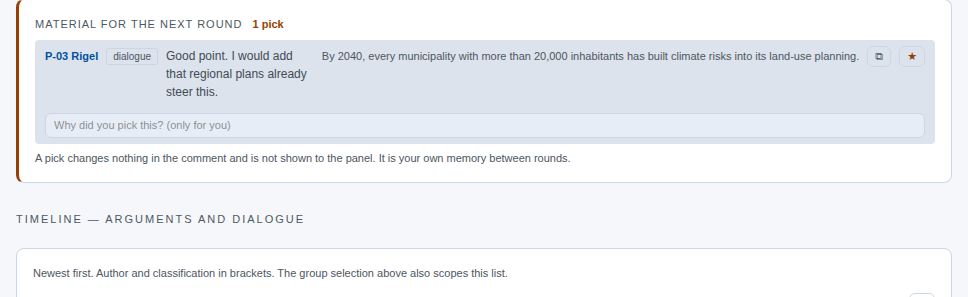
A pick does not change the comment and is not visible to the panel. It is your memory between rounds.
8. Close round 1
When the discussion has quietened down or the deadline has passed, open Round management. In the dialogue phase the card also shows a Disagreement row: on which theses the panel shares a view, where it is scattered and where it splits into two camps. To the summary → takes you to the detailed results.
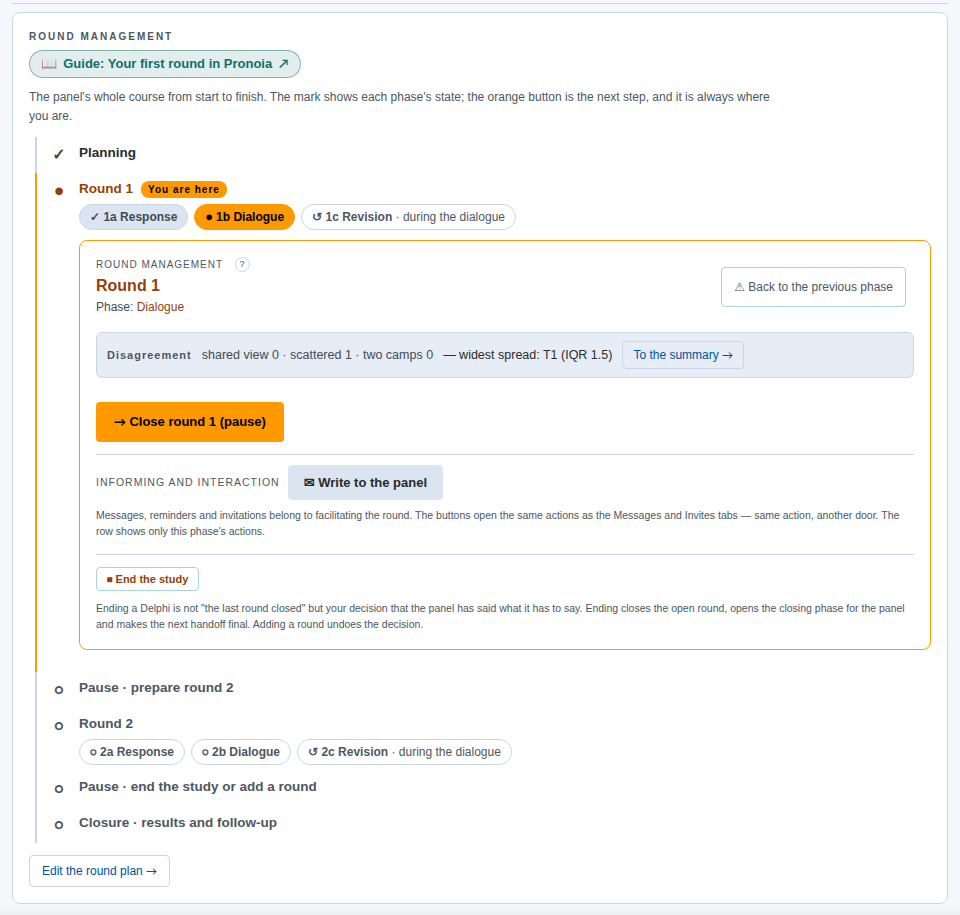
Press Close round 1 (pause). In Argument Delphi the revisions are made during the dialogue, so the round moves from the dialogue straight to the pause. Closing does not end the study. Answering ends, and the material waits for the next round. The study is ended separately with End the study when the time comes.
The What now? card now tells you that you are in the pause and names the next task: an instrument has to be chosen for round 2.
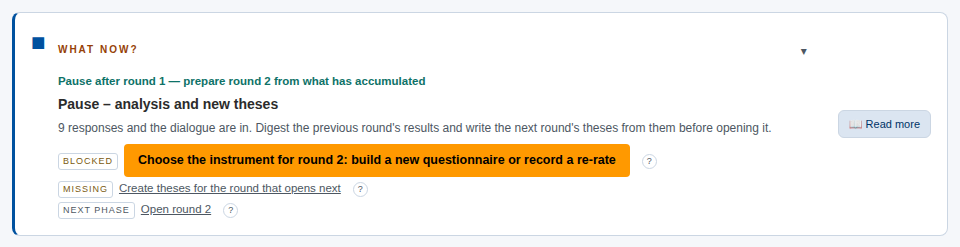
9. Prepare round 2
During the pause there is a card below the tab row: BUILD ROUND 2 — PREPARATION PAUSE. It offers three ways forward:
- Copy round 1 as a starting point brings round 1's theses in as a draft for round 2. You then edit them in the light of what the dialogue taught.
- Start from scratch → takes you to round 2's definition, where you write the new theses. Your picks wait in the Planning area › Theses under SOURCE MATERIAL FOR THE NEW THESIS: select picks, write the thesis, and the selected picks are recorded as its sources.
- Open with the same theses (re-rating) opens round 2 straight away, and the panel rates the same theses again.
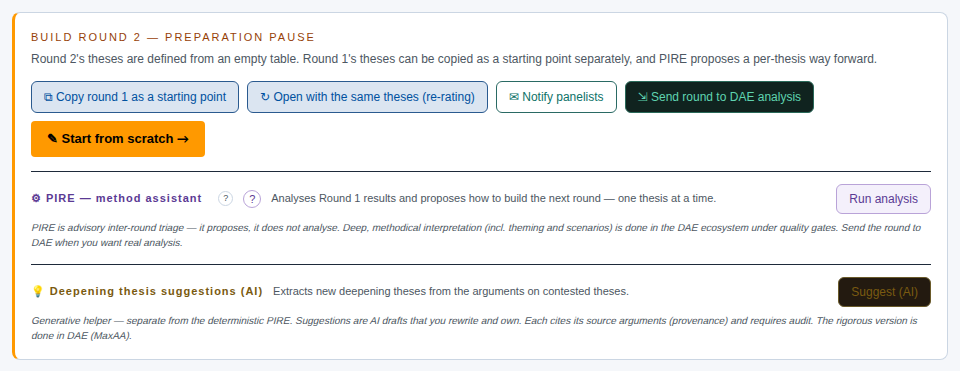
PIRE — method assistant (Run analysis) reads round 1's results and suggests, thesis by thesis, how the next round could be built. It suggests; it does not decide. Notify panelists sends the panel a message in Pronoia that round 1 has been closed and round 2 is being prepared.
When round 2's theses are ready, the round is opened in the same way as round 1, and the steps of this guide repeat.
Other variations
Classic Delphi runs through the same phases as Argument Delphi. The difference is in the aim: Classic Delphi seeks a shared view, so in the pause you read above all on which theses the positions converged and on which they did not. If the round's dialogue phase is switched off in the plan, the orange button after the response phase is directly Close round 1 (pause).
Real-Time Delphi runs a single round in which answering and dialogue are open at the same time. Opening is Open Real-Time Delphi (publish), and a panelist can change their response at any time. Round management has no phases; you close the window with Close the window (pause) once the picture is stable. No round 2 is built.
Barometer Delphi measures the same theses again wave by wave. The round is always open (Always open — a wave is saved, not closed) and is never closed. A wave is saved with Save wave 1 (the wave number changes), and between waves a thesis can be retired and a new one brought in.
Remember
- The round does not move on by itself. The deadline does not close the round, and every transition is your own decision with the orange button.
- Opening invites no one. Invitations go out only from the Communication tab or from your own email.
- Pick at once. Star a promising justification when you notice it. In the pause it is waiting for you.
- The whole process in more detail, including Round 0 and reporting: The facilitator's process, from planning to handover.
- Next: The second round and closing.
The second round and closing
Facilitation (Pronoia)
The previous guide ended in the pause after round 1. This guide carries on from there. In it you build the round 2 survey from round 1's results, open the round, close it and end the study. Reading the results and exporting the material for analysis are in the next guide.
The main path is still Argument Delphi. The differences in the other variations are at the end of the guide.
What is different in round 2
Round 2 runs through the same phases as round 1: response, dialogue and pause. The difference is in the questions. The second round of a Delphi usually asks new, more focused questions derived from round 1's results and discussion. Therefore:
- Round 2's theses are theses of their own. They are named R2-T1, R2-T2 … and round 1's theses R1-T1, R1-T2 …
- The panelist sees round 1's result next to the thesis from which the round 2 thesis was derived.
- Development between rounds is followed at panel level. When the questions are different questions, their figures are not compared one by one. The analysis shows how the shares of the classes (shared view, scattered, two camps) change from round to round. Qualitative development is read in the DAE analysis.
1. Build the round 2 survey
In the pause after round 1 there is a card below the tab row: BUILD ROUND 2 — PREPARATION PAUSE. The previous guide introduced its three ways forward. This guide takes the most common one: Copy round 1 as a starting point.
After copying, round 2's theses are drafts below the card. The copy inherits the thesis settings, for example the criteria, the scale and the required justification. Open a thesis with Edit and reword it in the light of what the dialogue taught. The thesis card's SOURCE MATERIAL tells you where the thesis was derived from (Derived from thesis R1-T1). If you starred comments in the dialogue, they wait under SOURCE MATERIAL FOR THE NEW THESIS: select a pick and write a new thesis from it, and the pick is recorded as the thesis's source.
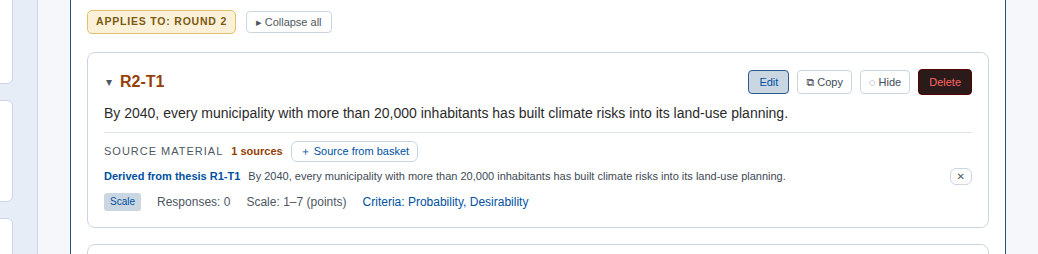
If you want to start over, Clear Round 2 removes round 2's drafts.
AI aids. The card also has Deepening thesis suggestions (AI). It picks drafts for new theses from the justifications of contested theses, and every draft refers to the justifications it came from. The suggestions are drafts that you word and own. The more precise argument analysis is done in DAE. PIRE — method assistant, on the other hand, is not AI: it computes a suggestion, thesis by thesis, from round 1's figures.
2. Open round 2
When the theses are ready, press the card's Open Round 2 (new theses) →. Round 2 is now open in the response phase, and the round card counts the round's own responses: three panelists times three theses gives 0/9.
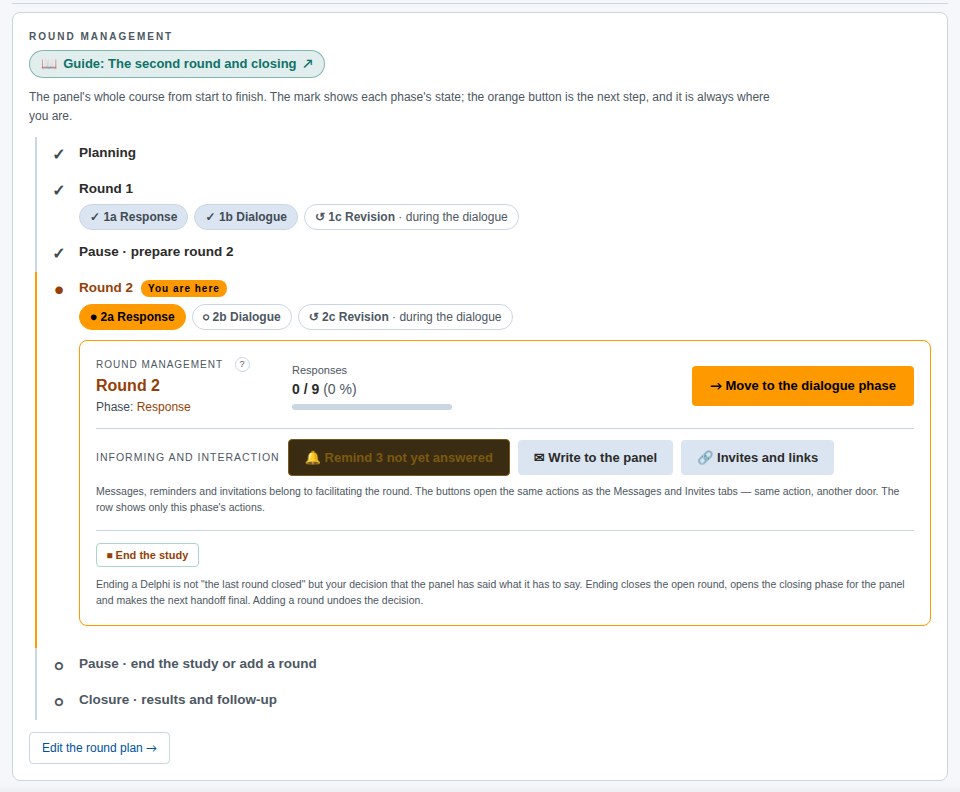
If you notice after opening that the survey is not ready, Return Round 2 to preparation returns the study to the preparation pause. Do it before the panel starts answering.
Invite the panel the same way as in round 1: from the Communication tab with the Round open template, or from your own email. A panelist's link stays the same throughout the study.
3. What the panelist sees in round 2
The top of the panelist's page says that this is a new survey: round 2's theses have been derived from the previous round's results, and they are answered afresh, not by editing earlier responses.
Next to a derived thesis there is a folded Round 1 result (R1-T1). When the panelist opens it, they see how the panel answered the thesis this one was derived from: the distribution and median per criterion. It shows no justifications and not the panelist's own earlier response. The result is folded by default so that it supports judgement rather than steering the answer. A new thesis that you wrote yourself has no such result.
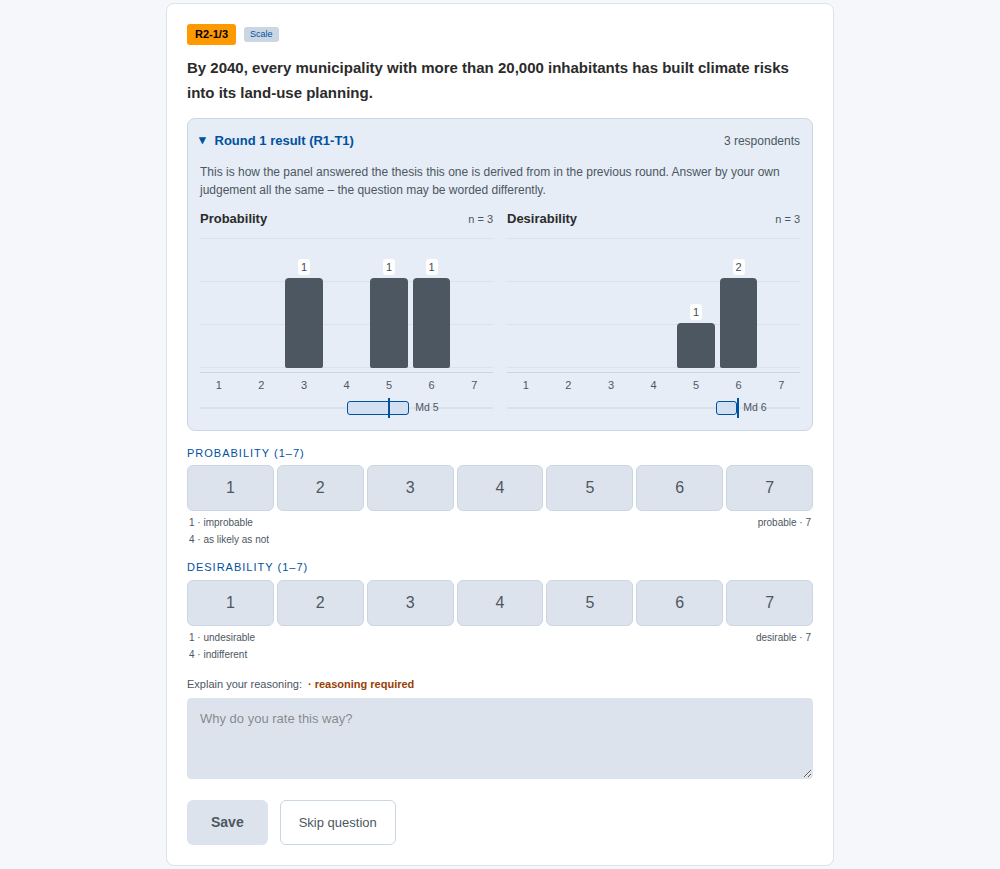
If you do not want to show the previous round's distribution, clear Previous round distribution in the response phase settings on the Facilitation tab.
4. Responses, dialogue and closing
Round 2 runs like round 1:
- Follow the responses on the Situation tab and remind when needed.
- Move the round to dialogue with Move to the dialogue phase.
- Star material in the dialogue if you plan to build a round 3.
- Close the round with Close round 2 (pause).
The round card's Disagreement row tells you, for round 2's own theses, on which of them the panel shares a view, where it is scattered and where it splits into two camps.
5. The last pause
When the last round of the plan has been closed, the path in Round management shows the step Pause · end the study or add a round. The What now? card says that the last round has been closed and the study is waiting for your decision. The study does not end by itself.
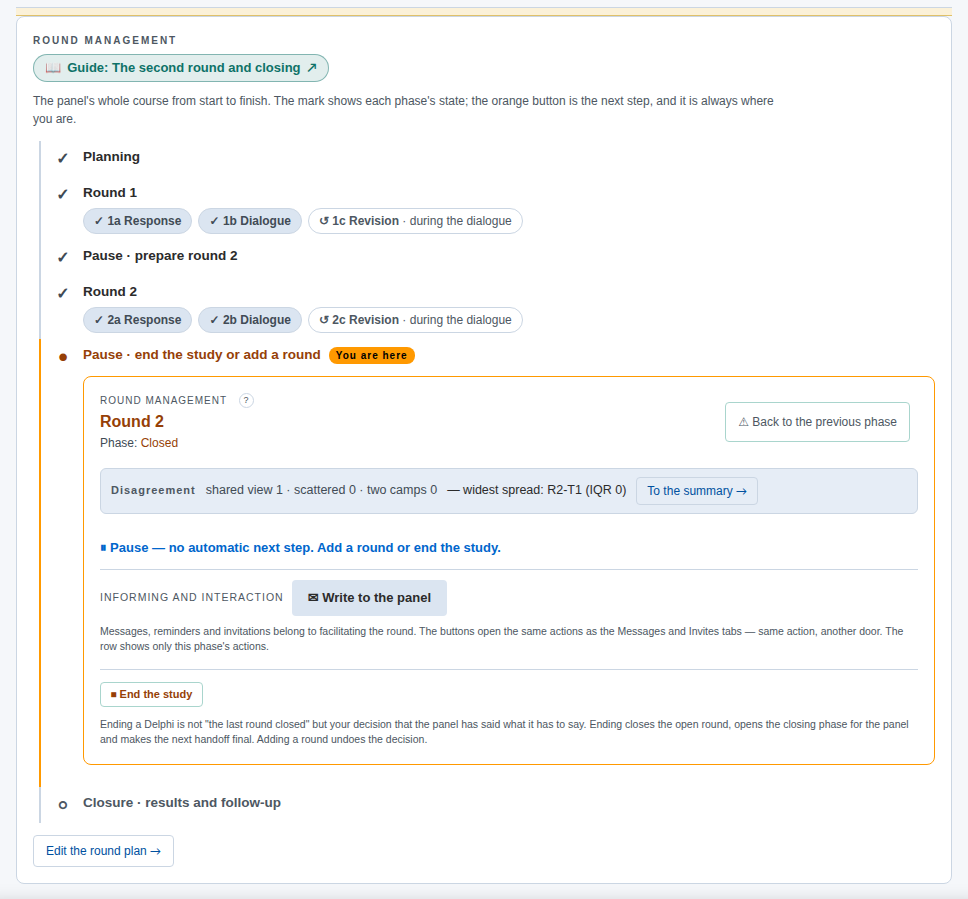
There are two options:
- Add a round. If the dialogue opened questions worth taking to the panel, Edit the round plan → adds a round 3 to the plan. You then build its survey the same way as round 2's.
- End the study. When the panel has said what it has to say, end the study.
Before ending, it is worth reading the results. The instructions are in the next guide.
6. End the study
In the round box in Round management, press End the study. Ending a Delphi is your decision that the panel has said what it has to say. It is not the same thing as the last round closing. Ending:
- closes the open round, if there is one
- opens the Closing phase to the panel
- makes the next DAE handover final.
The window Closing — end the study opens, with the form Closing letter to the panel. The letter is shown on the panelist's home page, and it can also be sent by email. The form contains a template letter that is a checklist of what the letter should cover: thanks, what the panel did, what was learned, what follows from the result, and a contact. There are two kinds of square brackets. Fields such as [name], [rounds] and [facilitator] are filled from the data for each reader: the form shows their values, and pressing a field inserts it at the cursor. Prompts are written in your own words or removed. There are two: [2–3 things the panel's answers showed – including where views differed] and [who receives the results, what they are used for, when]. In the picture the whole letter has already been written in the facilitator's own words, so no prompts are left. As long as the letter has a prompt, a misspelled field or a field without a value, the study cannot be ended. The form lists the points, and pressing a point takes you to it.
Under Attachments on the panelist's page you choose what is shown with the letter. The option Also show the panel the same descriptive report you see attaches below the letter the same descriptive results report you see in Reporting: the spread map, the per-thesis results and the highlights. The same report can also be offered as a Word file to download, and the Basic analysis figures per thesis can be attached. No attachments are selected by default. Attachments contain only aggregates, no justifications and no panelist codes. They are not an analysis.
The AI disclosure section shows how many AI panelists, AI responses and AI comments the data contains. Tick Simulated arguments were used in planning the study if you used them. You confirm the disclosure when you end the study, and it is frozen in the archive.
The option Also send the letter by email (through Communication) is on by default. It mails the letter after the study is ended, in the same way as other messages sent from Communication, and the form tells you how many it goes to. Preview the letter shows the letter as it will be sent. If you skip the email now, you can send the letter later from Communication with the template Closing letter.
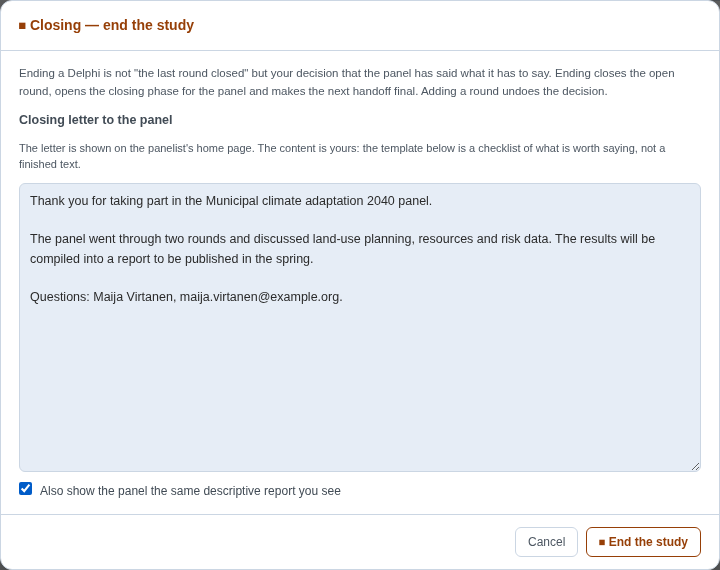
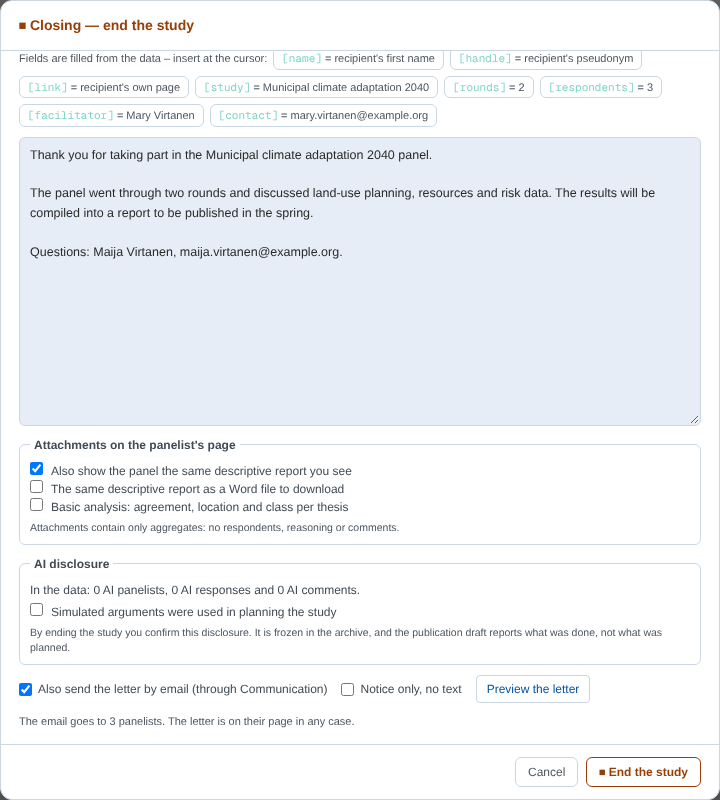
When the letter is ready, press the form's End the study.
7. What the panelist sees at the end
The panelist's page now says that the study has ended. Below that are A LETTER FROM THE FACILITATOR and the card THE NAME YOU WORE, which tells the panelist the handle the others knew them by (Aristonike in the picture) and that name's story in the history of Delphi. Then come the attachments you chose, and every thesis's final result: the panel's distribution and the discussion. The discussion and the panelist's own responses remain readable, but they can no longer be changed.
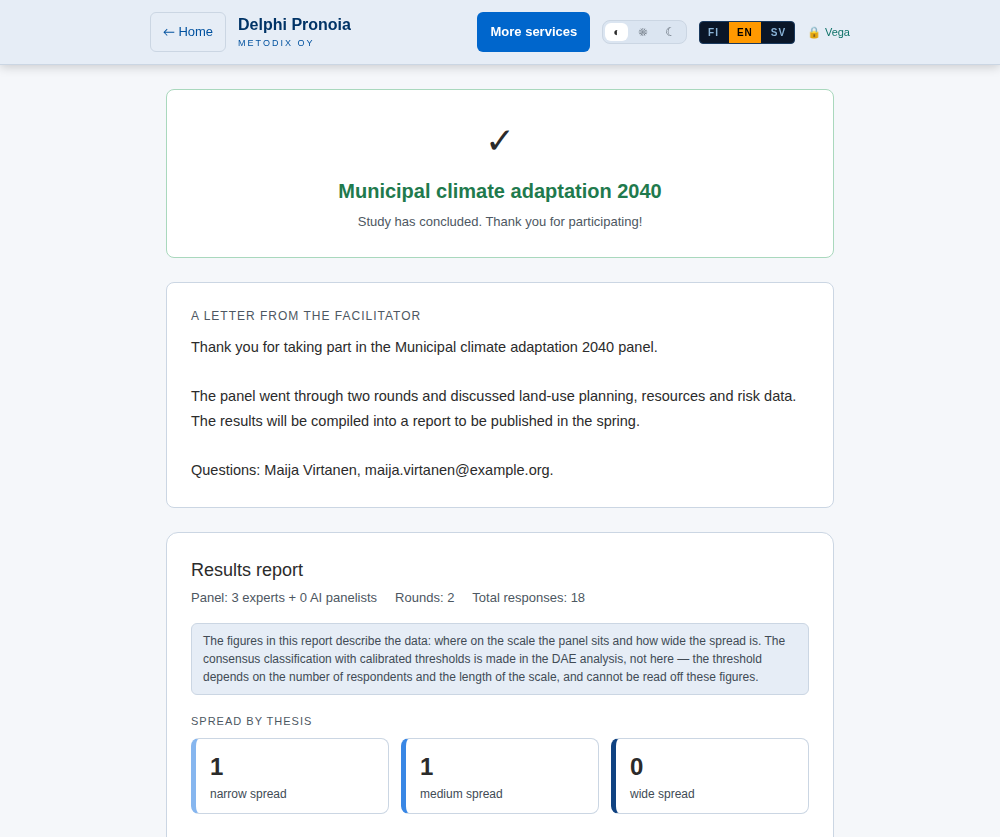
What can be undone
- A phase transition can be undone with Back to the previous phase. For example, a round closed too early can be returned to dialogue. The step back is recorded in the study's log.
- Ending can be undone by adding a round. The panel may already have read your closing letter, however, so tell it why the study continues.
Other variations
Classic Delphi often asks the same theses again in the second round. Then you choose Open with same theses (re-rate) → on the card. The panelist sees their own earlier response and can change their rating. Because the theses are the same, the analysis follows each thesis's development from round to round.
Real-Time Delphi is a single round. When you close the window, you are directly in the last pause, and the study is ended with the same closing letter.
Barometer Delphi does not close rounds but saves waves. A barometer is ended with the same End the study button once the measurement series is complete.
Remember
- Round 2 asks new questions. Build it from round 1's results and dialogue, and do not repeat the same survey unless it is a deliberate re-rating.
- The study does not end by itself. Closing the last round takes you to a pause, and ending is your own decision.
- The letter is yours. The template is a checklist: fields are filled from the data, and prompts are written in your own words.
- Next: Results and reporting.
Results and reporting
Facilitation (Pronoia)
This guide carries on where the previous one left off: the rounds are done and the study has been ended or is about to be. In this guide you read the results in Pronoia, make a descriptive results report for the panel and export the material to DAE analysis.
Keep the division of labour in mind. Pronoia describes what the panel answered: distributions, consensus and dissensus, changes of position and the amount of discussion. The figures are computed by rules, without AI. DAE interprets: theming, argument and discourse analysis, scenarios and synthesis are done in the DAE analysis pipeline under quality gates.
Where the results are
The results are in the Analysis area. Its tabs are Summary and, as tools, Statistics & change and Quantitative analysis. At the top of the area you can choose which round's material you look at (Round being viewed R1, R2). The report and the export are in the Reporting area.
1. Summary
The Summary is the overall picture of the study. Analysis — state of the material at its top tells you whether the material is readable and how much dialogue and how many changes of position it contains. With the choices on the CONTENTS row you show or hide sections.
- Overall picture: the numbers of theses, panelists and responses, and the response rate.
- Highlights: the thesis with the widest spread and the thesis that was discussed most. They are often the most interesting points for the analysis.
- Round movement: the change between rounds. If round 2 has its own new questions, thesis-level movement is not computed, because the questions are different questions. Then development is read from the panel-level figures of Quantitative analysis and from the DAE analysis.
- Per-thesis results: every thesis with its distribution and central values.
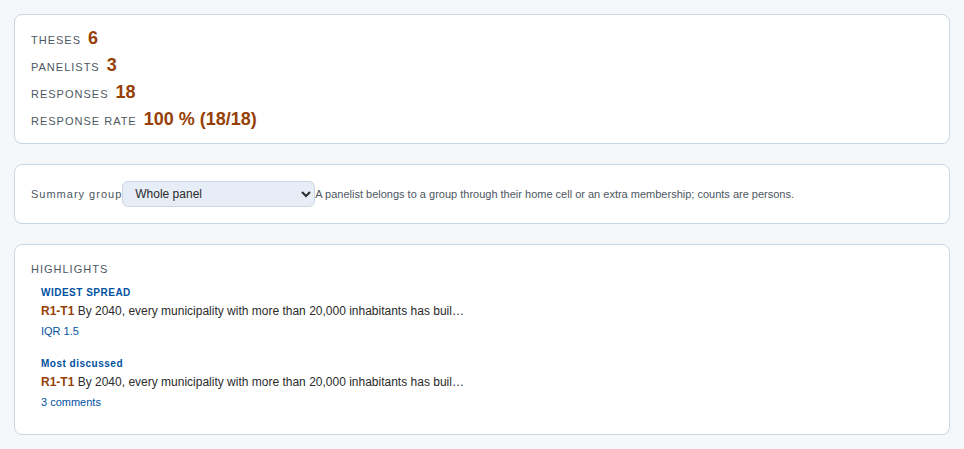
AI aids. The Summary's EPISTEMIC 7×3 HEATMAP classifies the justifications by their knowledge base and function. The classification can be done by hand or suggested with AI (AI-suggest coding). AI suggestions are suggestions that you accept or correct. The actual argument analysis is done in DAE.
2. Statistics & change
Statistics & change gathers the rounds' figures thesis by thesis.
- Per-thesis panel stats: respondents, comments, comments on comments, reactions, changes of position and the thesis's class (shared view, scattered or two camps). Theses are named with their round: R1-T1, R2-T1.
- Convergence: each thesis's agreement (A) and spread (IQR) from round 1 to the latest, with a label for the direction of change, for example stable. Rising agreement and narrowing spread mean that the panel is converging. A stable dissensus is an equally valid result.
- Dialogicity: how much the panelists commented on each other's rationales and on those comments.
- Shift directions and revisions: who changed their rating, in which direction and on what grounds.
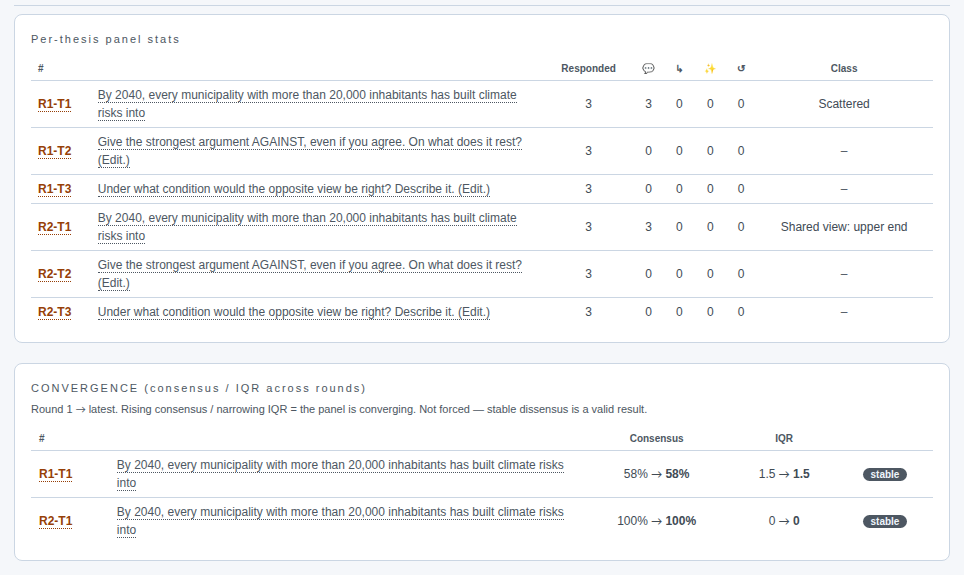
In Argument Delphi the changes of position are made during the dialogue. That makes them the most important part of the material: they show which justification made someone change their position.
3. Quantitative analysis
Quantitative analysis is the basic analysis of the panel's responses. It is computed with the same code as the quantitative stage of the DAE analysis (CP-2), so Pronoia's and DAE's figures are the same for the same material.
- Whose responses: People, AI panelists or Everyone. By default the humans' responses are counted, and humans and AI are not mixed.
- Round: in a multi-round study the analysis shows one round's questions, by default the latest. You can switch the round with the buttons.
- Composition of the survey: how large a share of the round's questions is a shared view, how large a share scattered and how large a share two camps.
- Table: for every question the number of respondents, agreement A, the location on the scale and the class.
- Development by round: each round's own class distribution. The questions of different rounds are usually different questions, so development is followed at panel level: does the share of shared view or of two camps grow. A question-level series is shown only if the same thesis has been rated again. In Argument Delphi the stopping rule is also shown, telling you whether the dissensus is argued and settled.
- Group comparison and Criterion pairs: whether the panel's groups differ from each other and whether two criteria, for example probability and desirability, go together.
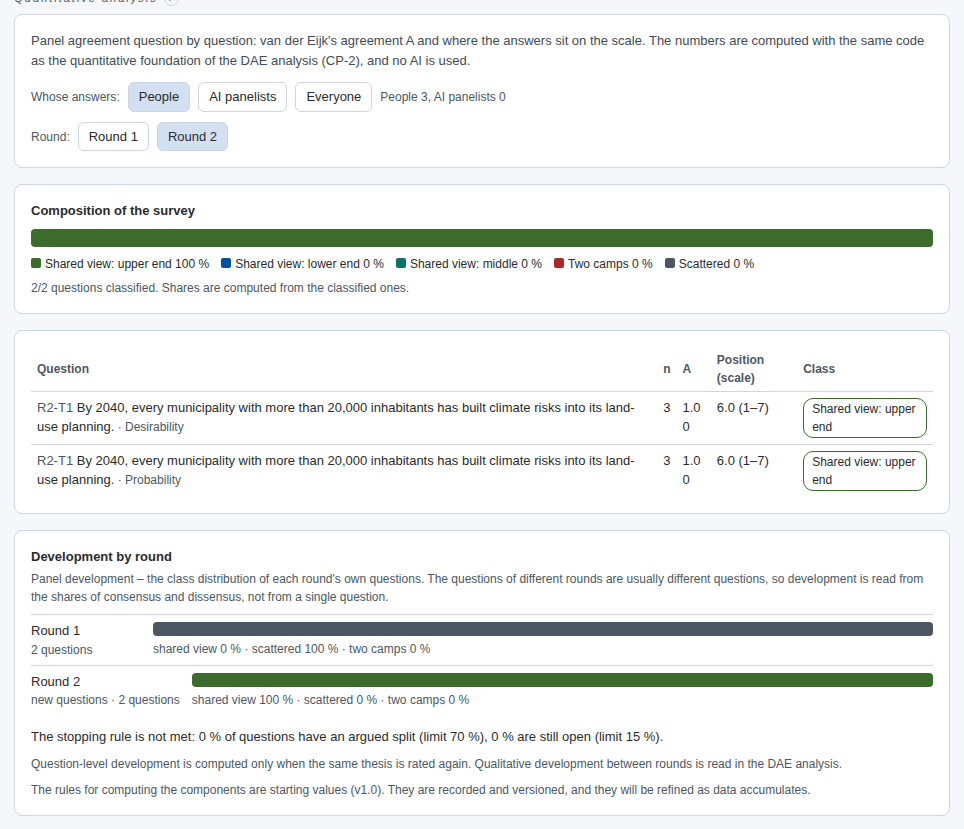
The figures tell you what is in the material. What they mean for the research question is a matter of interpretation.
4. The descriptive results report
Open Reporting › Reports. Generate results report compiles a descriptive report of the panel's responses: a summary and the spread by thesis. The report can be viewed in the browser and printed to PDF, and Download Word (.docx) gives it as an editable file.
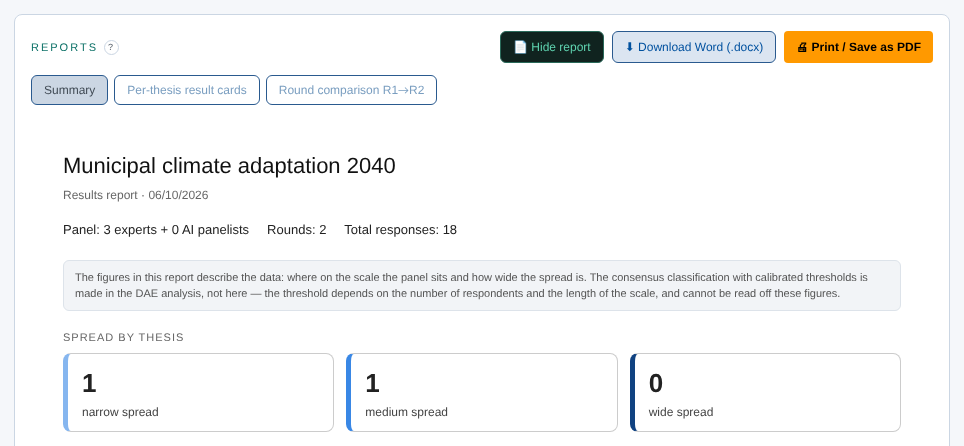
The report is source material, not an analysis. The same report can be shown to the panel together with the closing letter (previous guide).
5. Export to DAE analysis
Open Reporting › Export. The list Reporting — what remains at the top of the page tells you what is still missing for completing the study: readable material, the handover to DAE analysis, the results report, the closing letter and ending the study.
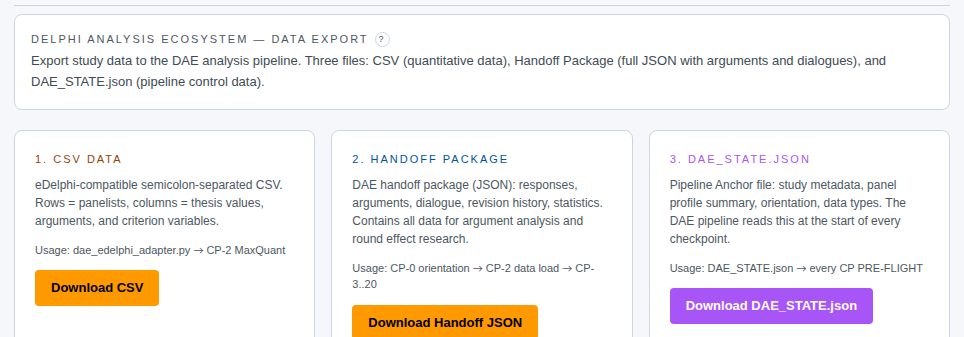
The export gives three files:
- Download CSV: the quantitative material as a table, one row per panelist.
- Download Handoff JSON: the whole material with justifications, dialogues and changes of position. This is the actual input of the DAE analysis.
- Download DAE_STATE.json: the control data of the analysis pipeline, such as the study's metadata, the panel profile and the orientation.
If the study has been ended, the handover is final. An export made before ending is an interim handover, and you can make one, for example, between rounds.
The bridge to DAE analysis
DAE analysis is an analysis pipeline that uses AI and is run in Claude. Save the three files in the same folder. Then open a new Claude conversation, type metodix and choose DAE analysis from the start menu. Attach the Handoff package. The pipeline proceeds checkpoint by checkpoint: the quantitative foundation, content analyses (dialogue, arguments, discourse), system analyses, the futures phase, synthesis, scenarios and reports. The qualitative development between rounds, that is, how the questions and justifications changed from round to round, is read right there.
Other variations
Classic Delphi seeks a shared view. Read above all Convergence and Quantitative analysis's lead indicator (the consensus indicator) if the same theses have been rated in several rounds.
Real-Time Delphi is a single round. No round comparison is made; instead Quantitative analysis reads from the timeline whether the responses have settled.
Barometer Delphi compares waves. Quantitative analysis shows what has changed from wave to wave and what has stayed.
Remember
- Pronoia describes, DAE interprets. Pronoia's figures are the result of rules, not interpretation.
- The questions of different rounds are usually different questions. Development is followed as shares of the classes (shared view, scattered, two camps) and qualitatively in DAE, not thesis by thesis.
- Export the material after ending the study, so that DAE gets the final handover.
- The whole process in more detail: The facilitator's process, from planning to handover.